
I painted a couple of sheets of 11 by 15-inch 140 lb. cold press watercolor paper with washes and splats of neutral gray, tan and yellow oxide acrylics, then pressed them flat between two drawing boards weighted with books.

The tile pattern and grout lines were refined through several test cuts and pasteups. I added a 3-point corner radius to the tiles to suggest age and wear.

After a few more test cuts, I loaded the painted watercolor paper and began cutting tiles. Because this paper requires three passes of the deep cut blade for each tile, I used masking tape on the edges to hold the thick paper to the cut mat to ensure adhesion. (Lessons learned through bitter informative experience.)
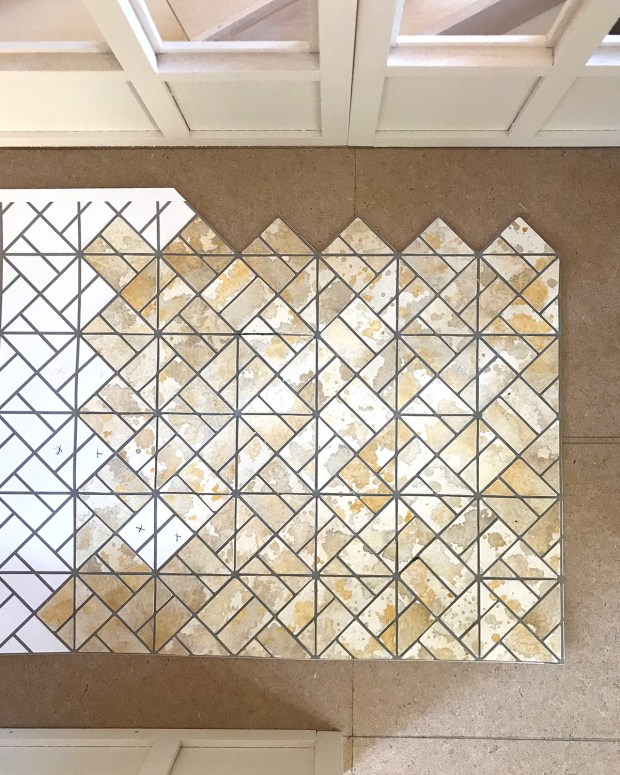
I’m gluing the individual tiles to prints of the pattern layout showing the grout lines. The process is far less tedious than I anticipated, a pleasant surprise. It *may be* that I won’t have to actually add grout after they’re all assembled and adhered to the subfloor. I plan to add one final light gray wash and some delicate speckling to the whole floor to unite the separate assemblies. And with pressing and a coat or two of matte varnish… we shall see.

The final tile floor won’t be put in place for some time — so much painting to do! — and the ideas for its total design still floating need not be finalized at this point. Which is good, because I’m still kind of all over the place, design-influence-wise. Right now I’m trending from Art Deco back to Bauhaus, and how that might all fit in with the larger Sea House story, sea level rise, and a crow named Clary.

Wow. That looks fantastic. Really, really good. The colors make my heart sing.
Yes, Yes, and Yes! Thanks, K.
I love the colors and pattern on the tiles.
Tanks, Sheila! Sloppy painting is so much fun :)
I love the tiles and the method for cutting them! I have found that Aleene’s Tack-It Over & Over Liquid Glue is also wonderful for sticking harder papers to the mats. If you don’t let it “dry” really well, it can make removing the paper a slow process. I painted and cut tiles from art board for the kitchen and bathroom tiles in my current project and love it, though mine have a more saltillo tile look with glaze on top. The structure is looking lovely and inviting from the door angle!
Jodi, thank you! I will definitely check out the Tack-It. There’s something about making one’s own floor tiles that really makes a build :)
It looks great and is really coming along.
Encouragement and acknowledgement for how I slave over my projects is always appreciated, Bennie :)
I love how you went from design to tiled floor–and I adore the fact that you have stories for everything you make.
Here’s sending you good thoughts for a continued, as painless as possible recovery!
C’lady, so much thankyous! Glad to say recovery has moved to the background, but is still going on. In some ways I feel like I’m being remade, and parts are still waking up. In a good way, and not too cranky.
As it happens, the story developing behind these builds is what’s fueling my interest, and making them seem worthwhile. Time will tell…
EXCELLENT results!!!
MANY thankees, E, for you encouragement :) <3
That’s a great floor. It draws you in with the depth of tone and color but it still neutral to complement any style you end up choosing. Well done! :D