Felines and Flora

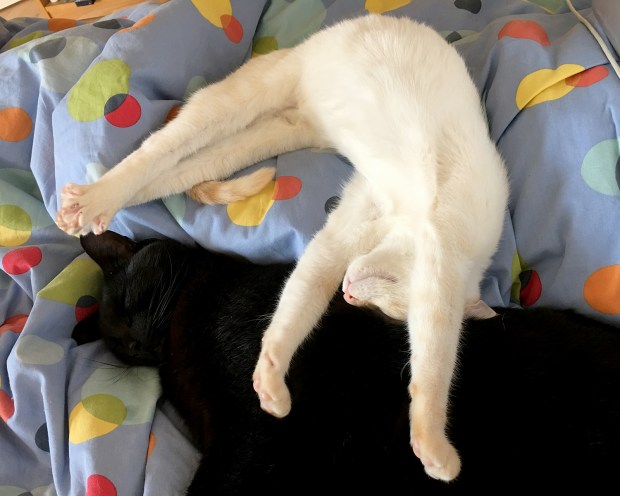
I’ll just get the cat pix out of the way first thing.

albie_scarlett_01_102916

albie_scarlett_00_102916

Classic long-suffering Albie and his unwanted sidekick. All he wants to do is sleep on the bed and not be mauled. She shadows and adores and mauls him.

stemmed_102916

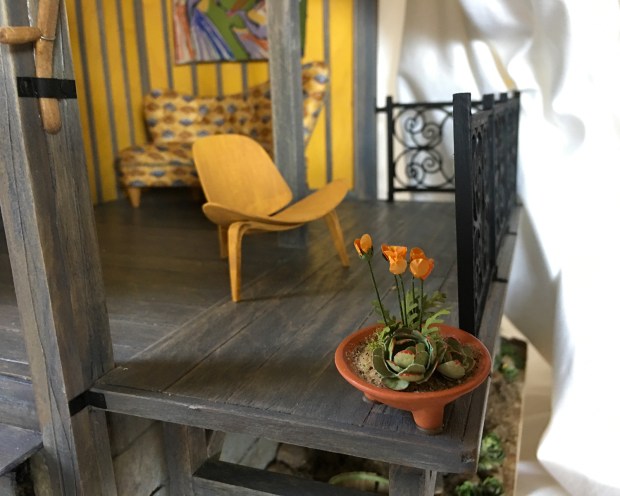
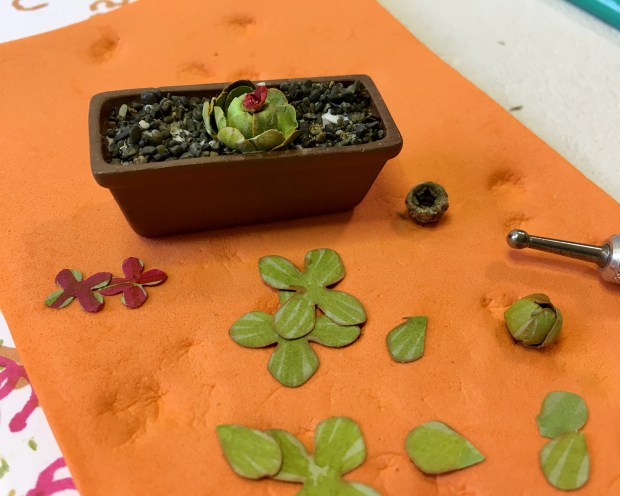
See the succulent/cactus hybrid hovering slightly above her sisters in the long planter? This is a new feature :) I’m adding believable stems to some of them.

stems_102916

This may be one of the most enigmatic photos I’ve ever published. Here are tiny stems very close up — they’re just over an inch long. They’re made from floral wire wrapped with torn strips of brown paper bag. Easy to make a gentle curve and plant.

palms_wired_102916

In other projects, I got all the sizes of leaves from JMG Miniatures to make potted palms for either side of the stairway. They come five to a bag and are cut from a nice green sturdy stock. I’m not even painting them! I glued a fine gauge green wire onto the central stem of each frond to enable sculpting.

palms_curled_102916.jpg

Once the glue was dry, I curled them around a fat watercolor pencil (Derwent Inktense, Teal Green 1300, not mandatory).

palm_wrap_102916

I gathered groups of three or four fronds, and bound them together with strips of torn brown paper bag.

palm_drying_102916

I bundled three or four frond clusters around another length of floral wire, and covered the lot of them with more torn paper bag strips, and stabbed them to dry in their eventual planters. These are those ever-versatile, well-modeled chocolate brown Houseworks tapered pots to which I had given a “zinc” finish.

palms_planted_102916

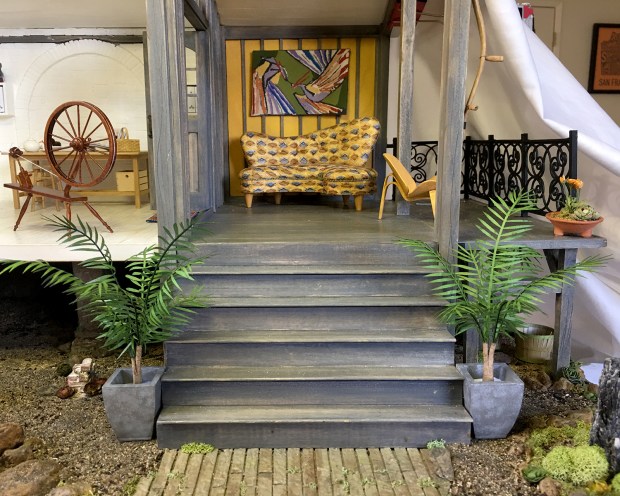
Here they are “palmed” and waiting for the glue to dry in the pots. I’ll cluster more succulents around the bases, tying in with the rest of the casual landscaping. I like how they both frame and add a “parlor” friendliness to the entrance. Since this is meant to be a refurbished working farm building, I didn’t want to put in a stuffy staircase banister.

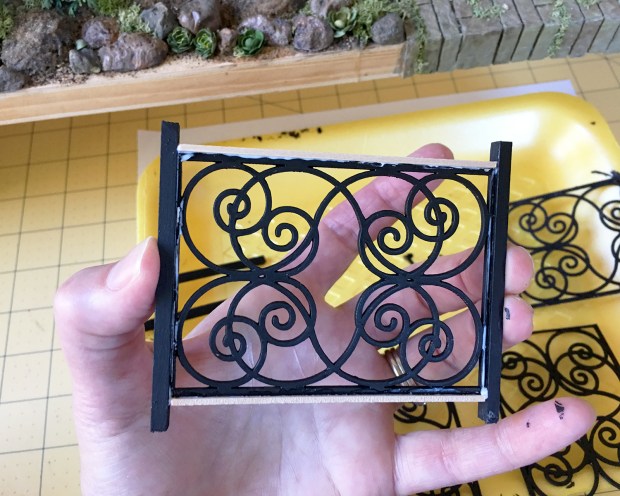
In the showroom proper you can see an exquisite spinning wheel, gifted by our beloved reader BW. We’ve both agreed it’s a bit too pristine, but I’m reluctant to augment it. I need to channel my inner Sleeping Beauty for counsel.

Until then…

Echeveria!

deck_ech_102316

Been making California poppy and echeveria planters for a little while now.

ech_poppies_102316

ech_flat_pots_102316

I first learned how to make echeveria from this wonderful tutorial by Annie Christensen of We Love Miniatures. She uses brushed pastels at the end to tint the leaves. All the succulents in the Argo Wool Works foundation plantings were made using her method.

Lately, I’ve taken to using markers to tint and edge the various shapes punched from cardstock painted with acrylic wash, as seen above.

Also, do you see those footed flat clay planters? They’re from Falcon Miniatures, made in Thailand, and seem no longer available. If any of you know a source, I’d be very stoked :)

new_ech_012316.jpg

This afternoon I was fooling around, searching for some new shapes from the limited punches I have. I covered a bottle brush seed pod with overlapping petal shapes, and set that in a base of cupped leaves. Then I stuffed an emerging flower shape in the apex hole — I really need to look up the correct botanical terms — and… a new, fairly convincing succulent/cactus hybrid variety was born! I’m quite pleased with its appearance and will post a step-by, after I get a manicure :)

stretch_joy_102316

This picture of Scarlett nuzzling into Albie expresses my joy. I expect one day to stop posting so very many cat pictures, but she is so stinking cute and delightful…


Starla Argo

starla_00_101016

Introducing Starla Argo, a seven-point celestial, who lives in the semi-autobiographical North Coast community all my builds inhabit.

starla_01_101016

This is a first prototype and is not fully felted or finessed. I’m happy with the proportions, but want to try out some different construction techniques for the star rays, as well as highlight colors.

I also just learned about Paverpol Craft Medium, a liquid textile hardener that seems perfect for preserving details. I want to read a bit more about it, and then check it out!

starla_02_101016

The “tin” sign above the cubbies is this old yarn label I found at the Graphics Fairy, then tinted with watercolor and glued to a flattened wine lead foil.

yarn_label

The pair of porcelain sheep figurines on the back wall bookcases are feves from ValueArtifacts. For which I credit and blame our dear reader Barbara W for my growing obsession. If you’ve not visited the shop, there are some treasures to be had. The tiny fish pitcher on the table is from there, as well as the sleek white and black mid-century cat duo in the front left corner.

Wroughting Iron, Again

hand_clamp_100216

The human hand often makes the best gluing jig, yes? After considerable deliberation about style, I’m making a salvaged wrought iron railing for the wee balcony off the Argo Wool Works showroom. These are portions of the same laser cut panels from JMG Miniatures used in the Sea House Warming Hut. The best thing about making “vintage” wrought iron is the globbier the glue and the cruddier the paint job, the more scale authenticity.

scarlett_100216-1

Observe my current working conditions. The railing joints are reinforced with black paper brackets and “bolts”, which add tremendous stability to the fragile structure.

scarlett_100216-2

Scarlett was on her way to inspect my suspiciously-tinkling glass of white wine (Layer Cake Sauvignon Blanc, vintage 2015, lovely). Soon after, she sat down on the many 1/16-inch punched bolts (and x-acto knife, etc.) which clung to her fur and trailed after as she sped on to the next investigation. (The dots clung, not the knife :)

porch_100216

The railing installed, with mounting brackets. It appears a bit too “freshly painted”, so I want to hunt down some examples in the wild to see how they oxidize. But not too much. Structural integrity is important :) Also made brackets for the scythe from Sir Thomas Thumb, which will support some sort of sign. Perhaps Lasciate ogne speranza, voi ch’intrate?

Nah. Probably just Argo Wool Works.

Napoleon, Poppy, Little B

Napoleon_082616

Napoleon visited Poppy the Fairy today.

Little_B_082616

Poppy was surprised to get an international letter, and gifts! from Little B, who would be a Butterfly Fairy, in addition to her five-year-old self. A Morpho, perhaps? Little B sent treasures to share with Poppy’s other correspondents —so thoughtful! — as well as a jar of butterflies punched from wildflower seed embedded paper…

porcelain_fairies_082616

these two porcelain fairy figures, just an inch (2.5 cm) high, AND an interior fairy door from Firecraft Miniatures, because she was concerned about Poppy living outside all year :)

Sharing the love.


Fairies’ve Got Mail

ava_071616

The still-vacant relocated fairies’ house has become a topic of speculation and delight in our neighborhood. My neighbor alerted me that the fairies had received mail. As caretaker, I brought it in for them. Above is a note from 5-year-old Ava, with a drawing of a fairy.

aria_071616

This is from her sister Aria, aged 3. Somewhat more abstract and, I believe, collaborative.

mailbox_071616

So I made a proper mailbox.

reply_071716

Had a fairy named Poppy write thank you scrolls in sparkly silver ink tied up with blue silk ribbon.

mailbox_installed_071716

And installed it streetside. This should be fun :)


Foundations, Éclairs

backwall_brick

Attempting to integrate the show-through back wall brick arch, I built a few brick foundation ruins.

backwall_brick_frosted

After sealing the bricks, I mortared them with DAP CrackShot.

front_frosted.jpg

They have been since grunged, weathered and eroded, and cast into the background.

More importantly, we celebrated my husband’s birthday with the question, What is your spirit animal éclair?

spirit_eclairs

We received so many heartfelt responses, mostly off the list of the available tiny animal figurines. Sloth, hyena, bunny… nope. Thus far, B has resonated with rhino and lion. I found the tiger encased on its side in delicious dark chocolate this morning; I’ll leave you to draw your own conclusions.


Back Brick Arch

back_brick_arch1_050616

After tipping the build backside up, and using the same pattern as on the inside wall, I glued on the bricks and sealed them with Mod Podge. I favor these bricks by Andi Mini Brick & Stone because they’re a solid color throughout, well-priced, and easy to cut.

back_brick_arch2_050616

Mortared with a palette knife and gloved fingers, using DAP Crack Shot. This and the following shot were photographed at night by ambient light of my Luxo lamp, hence the color variations.

back_brick_arch3_050616

Gruzz brushed on with gray and deep green powdered pastel.

back_brick_arch4

Finishing out the rest of the farmer style board-and-batten siding. Yay for using up offcuts. Fooling around with preserved reindeer moss, mostly roots and mid-structure  (rather than the rounded top mounds) to give a slightly more lichen-y feel.

back_brick_arch5_050716

The finished-for-now back wall. I added some floor board remnants and foundation elements to the existing structure. After carving out a lot of mortar and rounding all the exposed brick corners, I sea-sponged on a thin white wash of white acrylic, then re-scrubbed individual bricks clean. The siding nailheads are made with a soft-leaded pencil tip rotated in place, then wiped downwards with a fingertip to create stain trails. Convincing!

Now I have to do a bit of research on street names and sign styles of 1906 San Francisco. I’m tempted to use my old address, but have to see if the area was even developed then. (It was in the outer Richmond, near the backside of Sutro Park.) Alternately I could cut a very fine stencil of the Argo Wool Works logo

AWW_logo

to paint on the bricked-in arch, which might look something like this:

back_brick_arch_AWW

My final offering is this delightful piece filled with the pure light of truth, by one of my very favorite contemporary writers, Mallory Ortberg of the-toast.net

Everything That’s Wrong Of Raccoons

It’s satisfying to read aloud.


Ceiling, Standing Stone, Brick Arch, Yipes Stripes, Bench

ceiling_050316

For the Argo Wool Works showroom ceiling, I glued the two roof sections from the Backyard Bungalow base kit together, and edged with half- by quarter-inch (13 x 6 mm) basswood to extend the overhang. I measured the placement of the beams and walls in dry fit like three or four times, encountering anomalies each time.

roof_dryfit_050516.jpg

Yet another dry fit, this time with the upper window frames in place, and one section of ceiling planks. I’ve decided a 1/16-inch wiggle room is acceptable, especially since the whole ceiling and under eaves will be semigloss white, and any gaps will blend into the painted bricks… or something. I’m using the ever versatile 3/4-inch rustic clapboard siding from miniatures.com to cover the ceiling.

In the lower right of the photo you can see this standing stone feature I’m working on:

upright_rock_050516

It’s two gorgeous crystalline mineral shards that I promptly forgot the name of, found at a very eccentric bead and rock shop here in Pacifica.

back_brick_arch_050516

The back of the build was to be clad with the yellow and gray siding, but I decided today to have the bricked-in arch from the interior carry through to the outside wall for interest. I might mess with the foundation to suggest remnants of more of the building, too. There’s only just over an inch of space on the base, but I think it’ll be enough :)

yipes_stripes_050516

Small progress on the Yipes, Stripes rug, at 2.5 x +2.5 inches, it’s a bit more than half finished. It’ll fit well in the showroom. (Stitched on 48-count silk gauze with ten colors of Gütermann silk; making up the design as I stitch :)

bench_silk_050516

And here, lit by the westering sun, is my first bit of tie silk upholstery — nothing too challenging. Our dear BW sent a vintage Daisy House bench kit (so sad they’re no longer in business), and the fabric is a lustrous gray, black and ivory woven dot pattern. Thanks again, BW and Suz and Dave!