Warming Hut: Watching logs dry

Recently, HBS/miniatures.com wondered

So, again, we ask … How many of y’all use sketches to “concept” your mini projects? We’re wondering if this is the exception or the norm?

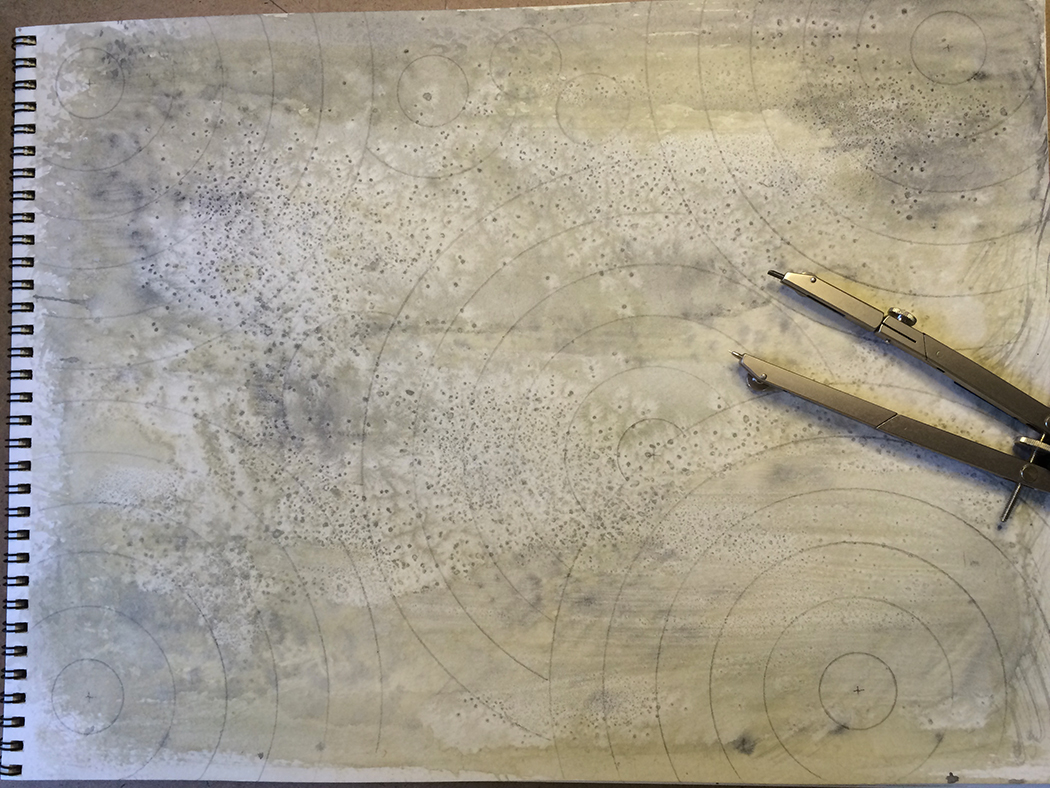
Here are some sketchbook notes from January, when I started the build:

www.nancyland.com

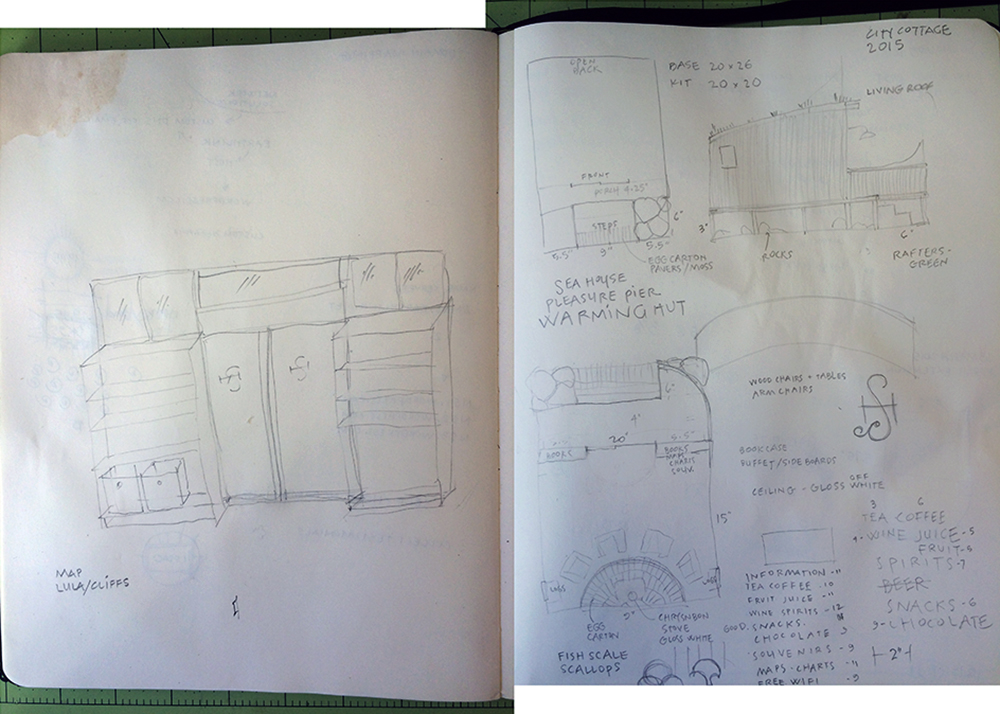
It’s a pretty clear — and typical — reveal of both my initial ideas and process: sketches, doodles and notes. Working with approximate dimensions helps keep things feasible. I have to sketch out furniture and cabinets and make cut lists.

I keep a paper folder of ideas, swatches and snippets of possible “things” as well as digital files for research and reference.

What’s unusual about these sketches and this build is how little I’ve diverged from my original concept thus far.

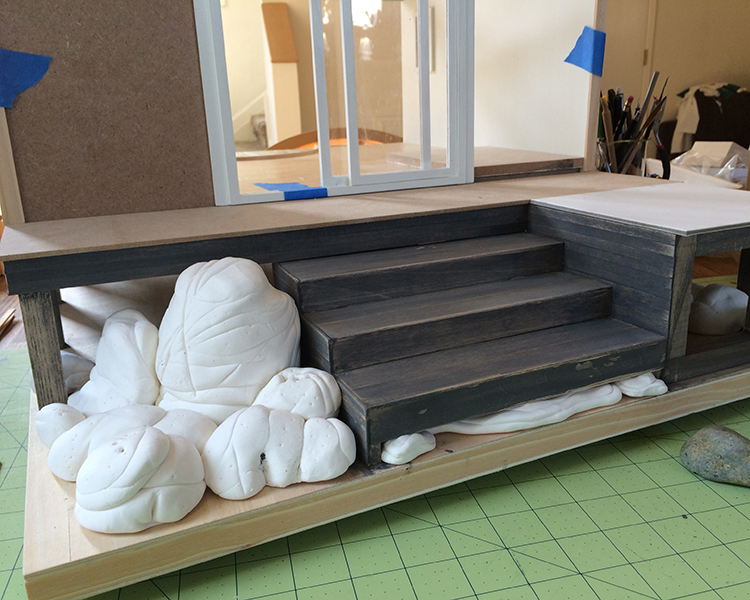
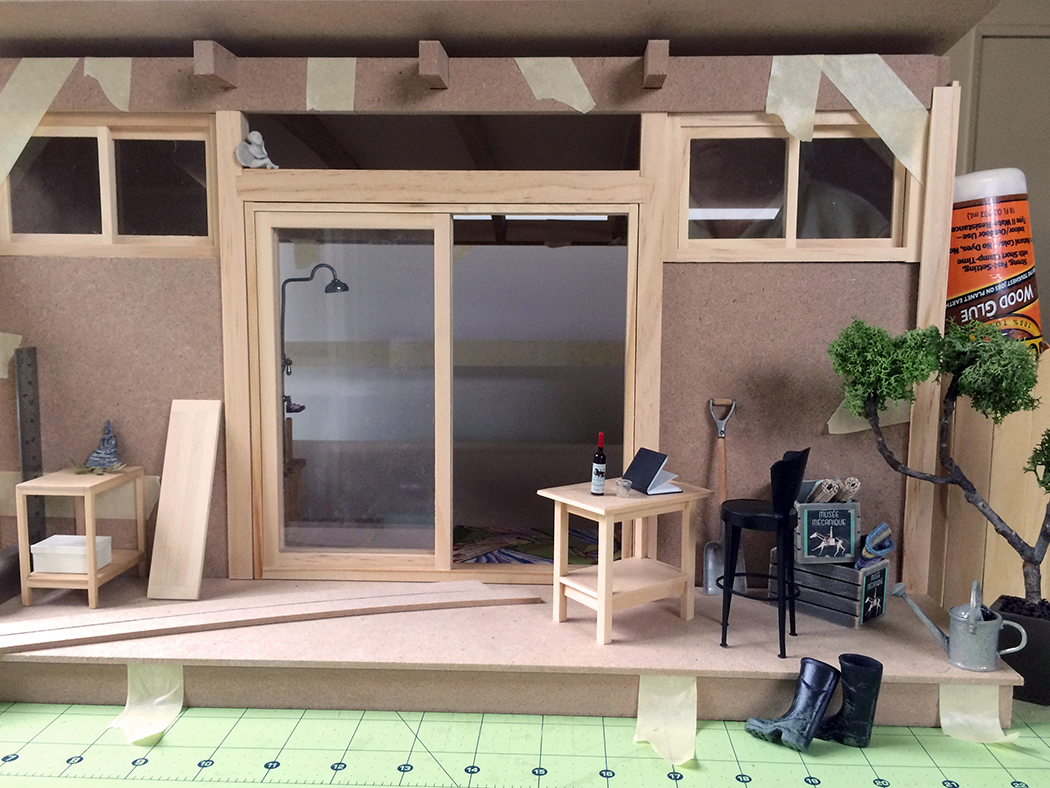
I made the front shelves and the wood storage under the back windows from inch wide x 1/16-inch basswood, and painted them the same Simply White as the rest of the trim.

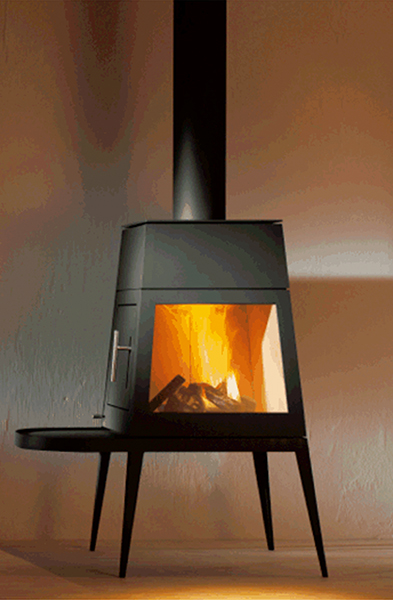
Today I took a pleasant meander around my yard looking for the right branches to make the logs. I chose a woody bottlebrush shrub (Callistemon) and pruned out several offshoots. These I cut into 1.25-inch logs and stacked into the wood holder with glue to fix them in place.

Then I sat with a glass of sparkling water, the lemony scent of the wood and the invigorating fragrance of eucalyptus mingling on the afternoon breeze.

www.nancyland.com

Warming Hut Rockscaping

www.nancyland.com

I’m using air dry clay to sculpt the boulders that populate the Warming Hut foundation. For the largest one I used a small tin and a plastic cup as a base, then coiled unevenly-rolled lengths of clay around it.

www.nancyland.com

I made certain decisions about the type of rock I wanted to see, then used my hands, a small metal ruler and a ball point stylus to make like the earth, wind, water and all the other magics of geology.

www.nancyland.com

This is my model rock for style and color.

www.nancyland.com

Even though the clay’s just one day dry, I’ve put the first coat of acrylic glaze on. There are a lot of rocks to build and paint. Most of them will fit under the foundation, as if the posts have been drilled and set into them, so the painting part will be a wee bit tricksy. (That was part of my conundrum of when best to glue or not to glue the hut in place.)

www.nancyland.com

The gaps between the boulders will be filled with beach gravel and tiny pebbles (from my prized collection), with some driftwood logs wedged in here and there, and small bits of greenery.

Warming Hut Deck Extension

Mockup of the Warming Hut deck extension, with a little Photoshop tomfoolery

Mockup of the Warming Hut deck extension, with a little Photoshop tomfoolery

The Sea House Warming Hut is snugged into a rocky outcrop on the cliffs, and will have an L-shaped front deck. Here’s a cardboard mockup of the extension, with the Bruce Dawson benches in place for scale.

I drew a plan in Illustrator to work out the measurements, based on the 5/8-inch square poplar I’ll use for the additional foundation and the supporting pillars. I like using Illustrator because I can enter exact dimensions, and easily move stuff around.

Deck extension plan (not to code)

Deck extension plan (not to code)

The exterior siding is going to run horizontally, and my plan is to wrap it around the curved deck wall in a seamless run. We’ll see how that goes.

There will be a wide stair leading up to the entry, either of wood or stone. Going to try the salt trick on the painted air-dry clay boulders and bedrock that supports the entire hut. And to top it all off, a living roof of moss, grasses and California poppies :) I ordered some flower kits from Georgie Steeds’ Miniature Garden Center Etsy shop. Love her stuff, as well as SDK Miniatures’ kits. HBS/miniatures.com used to carry some of the SDK kits, not sure if they still do.

I knew you were wondering. The rock formations you see in the ocean shot above is Pedro Point, southern-most in Pacifica, as seen from the cliffs at Mussel Rock, to the north.

a wealth of opportunity

modern miniatures

The limited edition 2015 HBS/miniatures.com Creatin’ Contest starting kit

Like some of the other miniaturists who were enticed to participate in HBS/miniatures.com build blog-along, I had already purchased and begun to build this year’s starting kit. And I’ll enter the Sea House Warming Hut in the contest come December 16, even though I have no aspiration of winning, having been honored with the Grand Prize in 2013 for my Sea House Pavilion. (Note to all those who don’t enter their projects because you think you have no chance: no one was more astonished to win than I was. Truly. So show your work and enter! It’s way fun.)

So what to do with this second kit provided by HBS?

Much as I’d like to, I haven’t the time (or space) to do another project. I’d like to offer the kit as encouragement to anyone who might be hesitant to enter the contest, or undertake miniature world building. Leave a comment, and I’ll randomly draw a name on Tuesday, March 31, 2015 from those who respond. I ask only that you consider using the kit to enter the contest, and that you pay shipping costs (I’m in Northern California, and the kit weighs about 11 pounds). What say you?

modern miniatures

Perfect furniture by Bruce Dawson, who has shuttered his studio and is closing out inventory :(

Not a lot of progress on the Warming Hut, what with all the March birthday celebrations.

I did see that one of my favorite miniature furniture builders, Bruce Dawson, is retiring (again) and closing out all his inventory through his Etsy shop bedMiniatures. Shown above are the unpainted 1:12 basswood items I picked up. (He has some half-inch scale pieces as well.) Do check out his shop. His prices are more than reasonable. There are still a few cherry Mission style tables and bookcases that are especially wonderful. Don’t miss this opportunity! You’ll be very, very glad.

Warming Hut Paint Prep

Warming Hut nancyland.com

There are many, many sides of many windows that must be masked, with many small strips of masking tape. But still, the paint will leak.

With 90 percent honesty, prepping and painting miniature woodwork is as tedious as prepping and painting their full-size counterparts. For the Sea House Warming Hut, I considered staining all the trim — a mildly less tedious process — using the same Minwax Classic Gray that the exterior cladding will be. Instead, I opted to paint a semigloss “Simply White” for contrast. My impatient paint application suggests the multiple paint layers slapped on over the years in an effort to preserve coastal buildings from salty corrosion.

And so I carry on, striving for both mindfulness in the process and the satisfaction that only sanding with tiny squares of 600-grit paper can bring.

Through the unpainted window above you can see the Chrysnbon kit stove I assembled and painted like 300 different colors before returning to matte black, that will heat the hut. Still unsure if I’ll use it. I’m rather taken with this modern “Shaker” stove, designed by Antonio Citterio with Toan Nguyen in 2006. I think it would translate to 1:12 scale beautifully, and be fun to build.

Shaker wood burning stove/fireplace, designed by Antonio Citterio with Toan Nguyen. Beauty.

Shaker wood burning stove/fireplace, designed by Antonio Citterio with Toan Nguyen. Beauty.

Finally, this is the unobscured featured image for March on this site’s landing page. It’s a birch tree in Soquel, California that wants to see you.

nancyland.com march 2015 header

Until next time, when the paint is dry, and ready to be sanded, then painted. And sanded.

Rafters and Stonework

modern miniatures, Sea House Warming Hut

Sand. Paint. Wait. Sand. Paint. Wait. Sand. Paint. Wait.

Got the first and second coats of paint on the rafters. I’m going to glue it up, then put a third coat on the whole assembly. And yes, it’s the same green (MSL 106 Rhododendron Leaf) used on the Sea House Pavilion :)

The floor is going to be wide-plank salvaged wood from the original Pleasure Pier, inset with a circle of native-quarried stone for the vintage wood-burning stove.

I painted several acrylic washes ( warm and green-gray, black, and “sand”) on 140 lb. watercolor paper and while still wet, sprinkled it with sea salt. Science magic!

modern miniatures, Sea House warming Hut, stone

When it was dry, I brushed the salt crystals off, and drew concentric circles the diameter of the surround.

modern miniatures, Sea House Warming Hut, painting stone texture

And cut them out. With scissors.

modern miniatures, Sea House Warming Hut, making stone tile

I cut individual tiles to fit the area and glued them down.

modern miniatures, Sea House Warming Hut, stone tiles

I “mortared”with a medium gray acrylic glaze. When that dries, I’ll give a coat or two of matte varnish.

Sea House Warming Hut, modern miniatures, faux stone tile

Next: wood plank flooring.

Sea House Warming Hut

Sea House has a new logo

The venerable and imaginary Sea House organization has a new logo!

Filled a couple of notebook pages with ideas, sketches, color studies and measurements for the new build for the HBS/miniatures.com 2015 Creatin’ Contest, then went back in time and crafted a new logo for the Sea House Pleasure Pier empire.

Sea House Warming Hut nancyland.com

It can get nipply on the North Coast, and a thoughtfully-provisioned warming hut is a welcome respite after a beach meander or cliff walk. Maybe even a destination?

and so it begins

Dry fit of the miniatures.com 2015 contest base kit

Dry fit of the HBS/miniatures.com 2015 contest base kit

Yay! Denise’s City Cottage Kit, the starting point for the HBS/miniatures.com 2015 building contest has arrived. Once again there’s an interesting roof line, and some solid other architectural details that invite interpretation. Here it is in dry-fit. No idea what it might become, but I’ve opened a fresh page in my notebook, and later will pour a glass of wine to help me listen and think.

I’ve 11 months to do so, as the submission deadline is 16 December, 2015. And because we can now submit our entries online, I expect I’ll be working up to the very last day, as my projects tend to expand to the maximum time allotted them.

Advice in the most unexpected manner

Anni Albers, MoMA
“Working material into the hand, learning by working it of its obedience and its resistance, its potency and its weakness, its charm and dullness. The material itself is full of suggestions for its use if we approach it unaggressively, receptively. It is a source of unending stimulation and advises us in a most unexpected manner.”

—Anni Albers, “Design Anonymous and Timeless,” Magazine of Art, 1947
From a piece by Sarah Jones on the Kaufmann Mercantile blog. The Josef and Anni Albers Foundation has more.
Image is Anni Albers’ Design for Tablecloth, 1930, from the MoMA

in no particular order

peacocks_120214Peacock rug getting there! Just the remaining green background left to stitch. Then blocking and binding.

(Finished size will be 4.625 x 3.125 inches (11.75 x 7.9 cm), 227 x 153 stitches, Gütermann silk on 49-count silk gauze, from a design by Roger Fry, as charted by Melinda Coss in Bloomsbury Needlepoint From the Tapestries at Charleston Farmhouse.)

Then I’ve been playing around with Kris Compas’s current tutorial for an upholstered parsons chair, using this great cotton stripe from a thrift store shirt. Other than (endless) work on the Peacock rug, I think this is the first miniature building I’ve done since I packed everything up to move in the summer. (The cording is made from three strands of DMC floss, and is more true to scale than using all six strands. In case you noticed.)

parsons_chair_120214

Penultimately, here is my first repeating pattern!

fish_seaweed_00

The color palette is a combination of hues drawn from photos of the ocean and from the persimmon tree in Soquel. The simplicity is perhaps underwhelming, but this represents hours and hours of work. Onward!

And finally, I did go back to the indie dollar store and buy up all the boxes of Prang KantRolls.

allthecrayons

Mostly because this:

crayons_120114