
A Maker am I!
A Maker am I!

I was given a wonderful pack of assorted Dresden Trim, as well as an entire sheet of fish. I spent a pleasant few hours sorting through the scrap, snipping and arranging the bits and pieces. Things got interesting when I started combining parts of one with another. Above is the beginning of an illustration for 2018.
![]()
I cut the wings from a bird in flight (a swift? a swallow?) and this happened. I felt an instant sense of recognition, like I had met a new old friend.
![]()
I made the ladder longer, and glued the pieces together.
![]()
The back is reinforced with toothpicks and cardstock circles cut to the wheel dimensions, stacked and glued together, then glued to the outer rim.
![]()
Because I’m not a stamped gold foil kind of girl, I spray painted her matte black. Please say hello to my new avatar.
![]()
She shows up strikingly against many backgrounds.
![]()
I gifted her shoes made of black eyelets and tacky wax. She stands freely, observant, curious and full of questions.
![]()
However… sometimes it’s hard being 2.5D in a complex 3D world. You can lose touch with essential parts of yourself.
![]()
We believe it’s good to have your head in the clouds, and your feet on the ground.
![]()
And have your heart wide open… but sheltered by something good.
(These particular Dresden trim pieces came from Castle in the Air, but I have since found three other good online sources: Rose Mille; Dresden Paper Crafts; and Walter Kunze.)
Happy good holidays, maybe slightly askew, to each and every one of you ❤️

Last night — Good Solstice, all! — I set to work installing the ceiling lights in the Sea Rise Pavilion kitchen.
Because I’m such a lighting electrics n00b, I used five 3-volt chip LEDs, set in mini eyelets. They are tragically insufficient to light the kitchen. But hey! I learn by doing. So I went to bed.
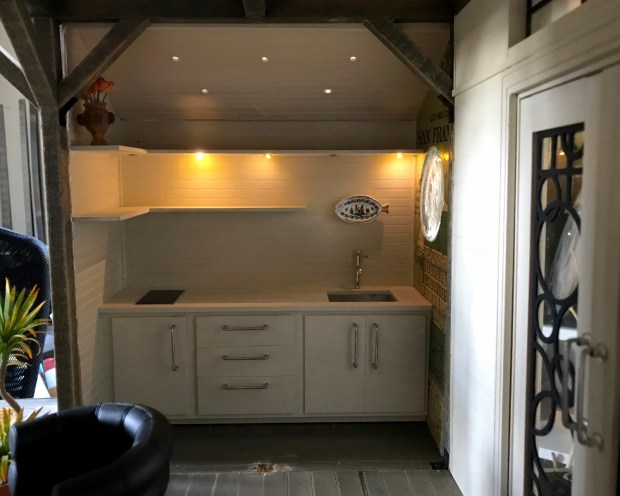
This morning, I ordered some larger (3mm) LEDs, then pulled the chip LEDs and eyelets from the ceiling installation. (Those are the holes you see.) Under-shelf lighting seemed like a good use of the sadly pale chips, so I plotted a layout in Illustrator to use as a template, and drilled new holes in the upper shelf. (Um, not an ideal construction protocol, the drilling of already-installed things.) I methodically undid all the twisty magnet wire connections from the ceiling — thankfully I had not set the heat shrinks — and reset the eyelets under the shelf. With my teensiest drill bit I made exit holes for the wires in the back wall, in line with each eyelet.
It is a good setup, but two of the chip LEDs did not fully survive. (Though they do work intermittently, argh, whygodwhy?)

Then I walked out to see this sunset over the ocean. One can aspire.

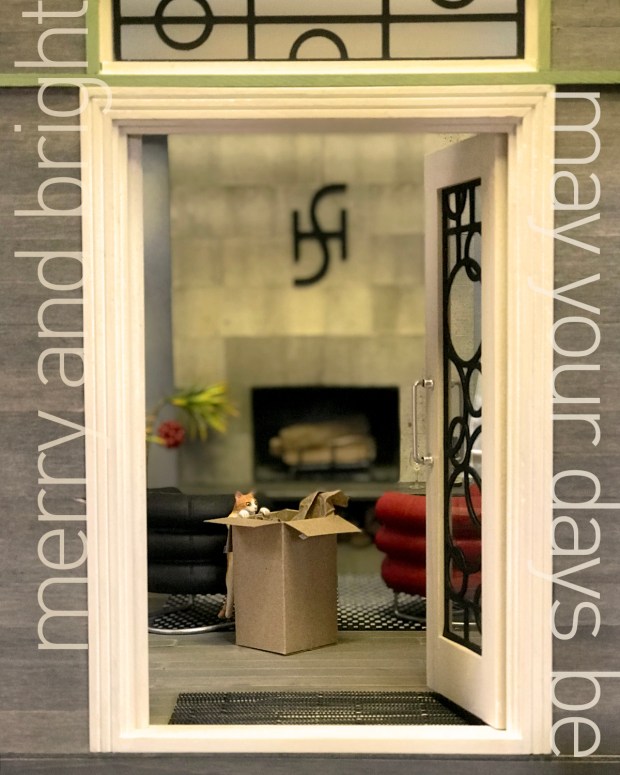
There’s a new set of boxes over at MMS+S, reminiscent of the “dish pack” size, for all your miniature packing needs.
I installed ELF handles set in reversed eyelets on the Sea Rise Pavilion front doors, and then glued the whole panel into the frame. I think I’ve finally worked out which components will be attached together, and which will remain removable. Rethinking having the hydroponics inside the greenhouse; they might get moved to the lower back utility deck. There is still much I don’t know.

Working on a simple slipcase kit to fit single and triple sketchbooks, in the classic and smaller sizes. Adds a nice finishing touch, and keeps your shelves and bookcases looking tidy. (And yes, that’s an April Wright mug — her pottery is wonderful! The wee bear bowls being used as bookends are feves from Laurel’s ValueARTifacts shop.)
Other stuff in progress and in sketch phase, brimming and swimming with ideas and plans. Focusing now on finishing up work projects for the year, and spending the holidays with family, and taking some time off.
Be good to yourselves, dear imaginary friends!
I’m excited to share photos of some incredible yuccas, made by two different miniature artists, both starting from the same kit.*
*Uhh, to clarify: each had her own kit. Two artists, two kits, two locations. Nancy B finished first. Not that it was a contest.

This is Nancy Bristow’s work. (Nancy has been making miniatures since the 1970s, and it was she who finally identified the Braxton Payne pots I had bought at auction, and pointed me to his obscure website.) She hand-colored the leaves using markers, and I love that she styled them curling out and upward. So pert and jaunty! They’re planted in BP pots she “aged”, and used bird grit as gravel.

Here’s a shot of Nancy’s work-in-progress, adding knot holes to the stems. I noticed she chose to curl the leaves first, before attaching to the stem. Brilliant! It is so gratifying — and informative — to see how other makers work with my kits. One can learn so much.

This is Keli Minick’s interpretation of the yucca tree kit. Look at those colors! I love the graceful trunk, and the stubby branch. Two completely different plants! She suggested using round nose pliers to separate and shape the leaves after attaching — which makes the process much less tedious. And she kindly pointed out a typo in the armature instruction sheet. Argh!

Here’s what the Broad Leaf Yucca Tree kit looks like to start. This is the green leaf variation; cream and white are also available. (I believe Nancy B started with white leaves; Keli with cream?)
What would you make of it?
Sincere thank-yous and expressions of humbled awe to Nancy B and Keli for allowing me to share their work.
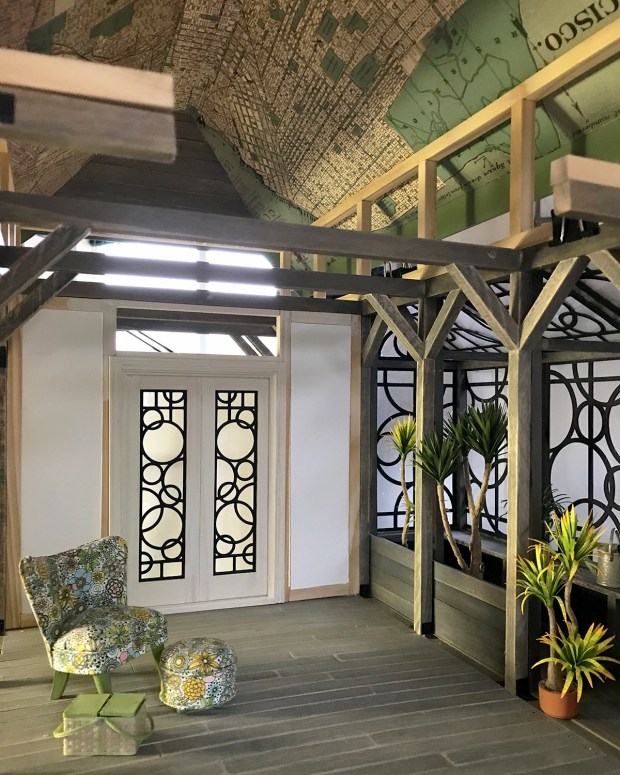
I finished planking the Sea House Pavilion front entry remodel — though there are still stain touchups to do. This build is very different in that components will remain modular, to facilitate access and photography, rather than be a single, connected structure.

Inside walls are stained eggshell white. The main living area ceiling (the underside of the sleeping loft) is in, made from bead-board paneling. (Here barely seen, as IRL).
You can glimpse the original Pavilion roof ceiling, now lifted to accommodate the sleeping loft.
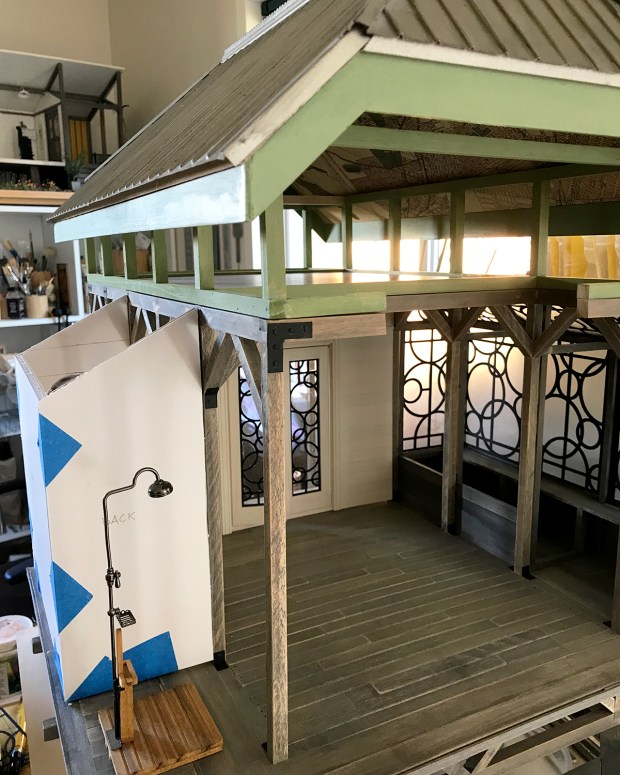
A view of the sleeping loft addition, and a roughed-in kitchen wing and shower stall (fireplace removed.)

After deliberation, I chose varnished cork for the sleeping loft floor, which occupies three bays. Many more decisions remain, especially since I’m thinking ‘nest’ rather than traditional bedroom. Think ‘sleeping in a pile’ (my favorite!) from Where The Wild Things Are. Because post-sea-level-rise living will probably benefit from that.
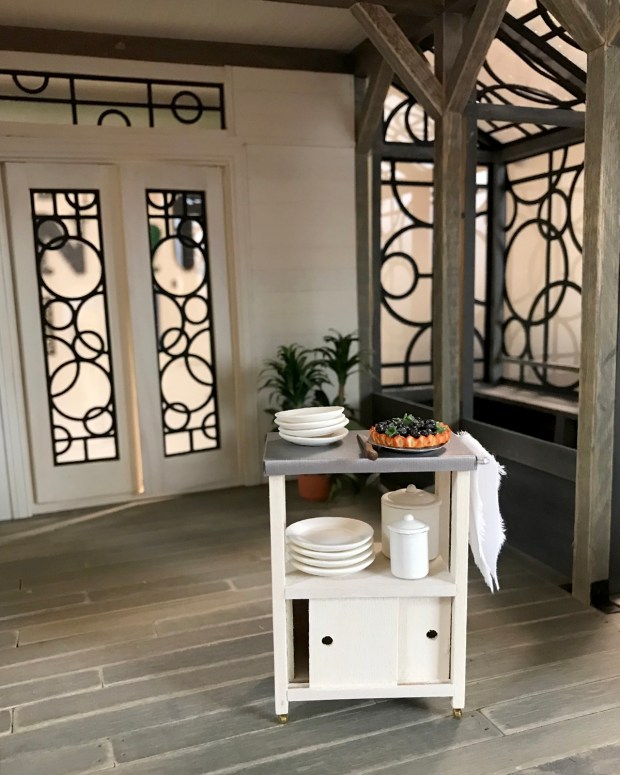
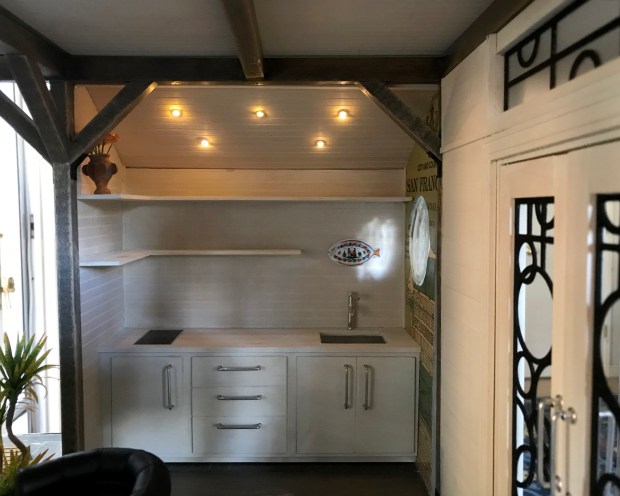
I made my first-ever ELF Miniatures order, for this kitchen trolley kit, as well as an under-counter sink and 2-burner stovetop surface for the kitchen wing. I am smitten.

The kitchen wing occupies two bays, and will have a countertop with sink, prep area and the two-burner electric stove (powered by rooftop solar panels.) There’ll be non-opening cupboards below, and an under-counter refrigerator. Two walls are paneled in horizontal bead-board, to which there will be shelves attached; the third wall is papered in the same vintage San Francisco map as the ceiling. The window is made from this weird thick glass disc, a bag of which I found in the crap/craft store.
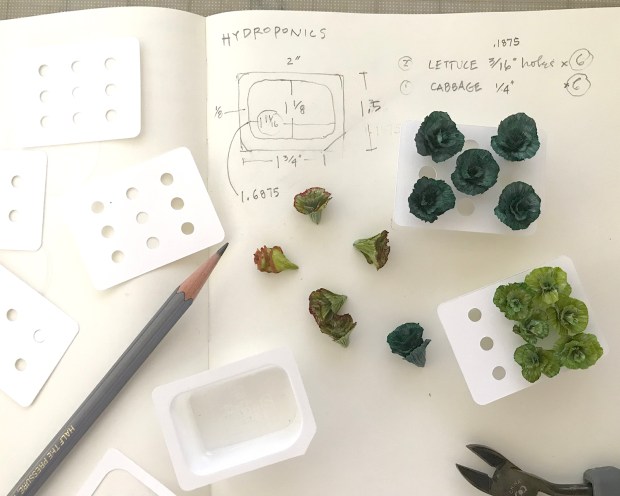
Moving on to greenhouse hydroponics. I did a bunch of research to arrive at an aggregate vision of what a system might look like on an off-the-grid tiny home scale. The grow vats are restaurant jam tubs. I made some wonderful Georgie Steeds lettuce and cabbage kits, and from there worked out optimum growing layouts. I fiddled with the vat top layouts, and used the Cricut machine to cut the final patterns.

I noticed many hydroponic systems had these sort of “grow rings” around the cutouts. They appeal to my graphic sensibility, so I laboriously added them to the system. They can barely be seen beneath the lush growth, but we and the devas know they are there.

To the greenhouse I added rails and slats to support the grow vats. I’m experimenting with wire and shrink tubing to evoke a water and nutrient circulation system. One of the challenges is keeping each of the wings modular, yet connected as a whole. In that the greenhouse and kitchen wings need to connect to the solar panels and water collection systems located on the pavilion roof and aft deck. As do the roof gutters need to funnel rainwater into the cisterns located under the pavilion. And so on.

I leave you with a view of Georgie Steeds’ Nasturtium kit. It’s just barely finished, plonked in a Braxton Payne pot and glop-waxed to the bench. I love nasturtiums; they’re ubiquitous in NorCal gardens. I’d very much like to twine these throughout the greenhouse wing, while also keeping it detachable. We’ll see.


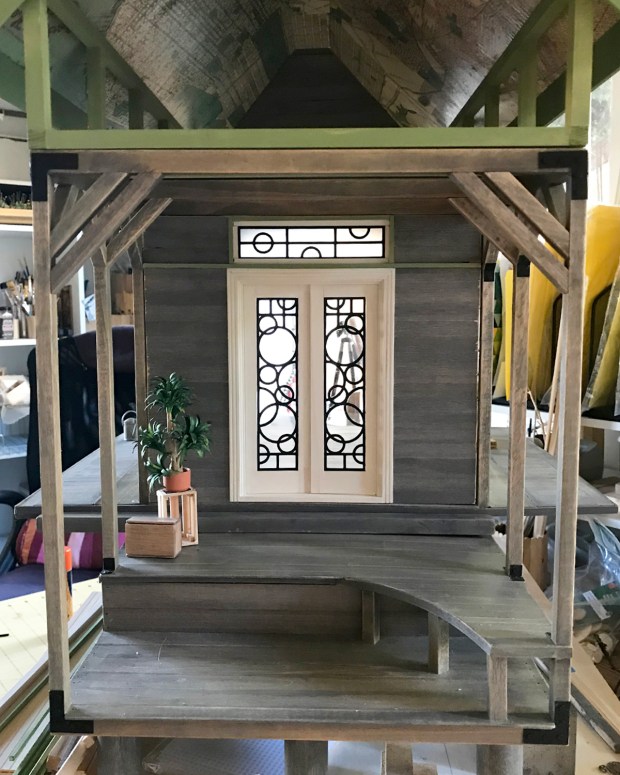
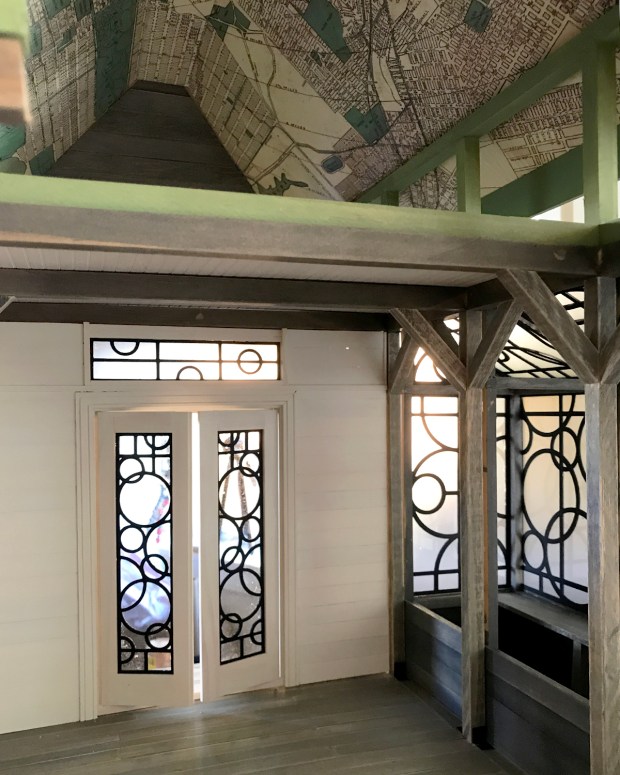
Work has begun on framing in the front entry, using 3/8-inch stock to match the existing structure. I chose a set of Houseworks French doors, installed backwards so they open outward. There will be a 5-inch wide transom window above. The door woodwork is finished in an eggshell white stain, and the two side panels will be reclaimed weathered gray horizontal planking.

I got curious about the line weights in intricate pattern that I might successfully cut (and remove from the mat) on the Cricut, and got down to 6 points (.083-inch / 2.1 mm). This seems a good scale for the narrow panels of the doors and transom (the greenhouse window leading is 9 points (.125- inch / 3.2 mm).

The difference in scale between the front doors and the greenhouse windows makes sense (especially now that I know I can cut finer line weights). The interior front wall will be planked in the eggshell white stain, with a matte varnish.
Now I’m thinking on how the ceiling between the main floor and the sleeping loft will work, and how to finish out the fireplace through to the roof — some tricksy geometries. I ordered a bunch of vegetable kits from Georgie Steeds at The Miniature Garden — my favorite miniature plant kit purveyor — to populate the long shelf in the greenhouse. The interior greenhouse windows are open to the room so the potted trees can reach out.

Also, how is it almost November?!

The topic of this and last week’s Santa Cruz commute thinking time was about how to render the Sea Rise Sea House Pavilion’s greenhouse windows. I knew I wanted to do something leaded (or leaded-esque), and I knew the inevitable off-square measurements of the actual structure would be a nightmare to fit.

I’ve built two wing extensions on either side of the main deck to increase the living space area. One side is the greenhouse, and the other will be the shower and sleeping alcove. For the greenhouse leaded glass, I drew my designs using 9-point (1/8-inch) lines, which seem reasonably robust for a seaward structure. They’re cut from black cardstock, and glued front and back to non-glare Plaskolite, which provides a semi-opaque — and salt-spray burnished — surface.

My initial approach was to tediously center the Plaskolite within the 3/16-inch framing. (Of course if I was more dedicated, I would have routed a channel in the one million each of the frames, or, have built them with three layers of stock. But I’m not.) As I was fiddling about with measurements and drawing and cutting prototypes, I realized the best — and squarest — way is to cut the panes and cardstock leading a scant larger than the outside window openings, and glue them atop the frames. Then, trim out with thin strip wood.

It looks just fine! Intentional, even. The two layers of cardstock, glued to the Plaskolite front and back, look believable. Even the little schmutzes of glue make sense in a marine environment (although they are easily cleaned up.)
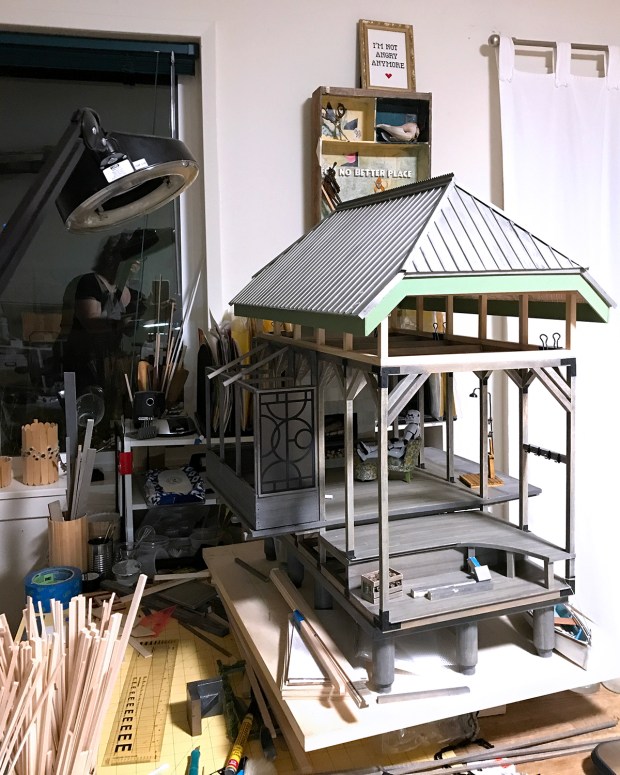
Here’s the whole structure-in-progress, including the new roof extension, which might be where the sleeping quarters wind up.

And here is the main — or one of the many — reasons I drive down to Santa Cruz each week: for Ruby, now four months old. She lights up a room, no batteries, routing or wires required.

Turns out — after a lot of experimentation and test builds and weathering practice and pondering and faffing about — as much as I am captivated by abandoned miniatures, I do not wish to actually build one. I felt a bit sad when I realized this, but also relieved. The pavilion remodel still has sea level rise as a core premise, but now it’s more of a retrofitted, off-the-grid, self-sufficient adaptation that’s been going on for some years. With scavenging and memorabilia. The old skiff, with its faded Sea House emblem, stays. Stormy is just passing through :)
