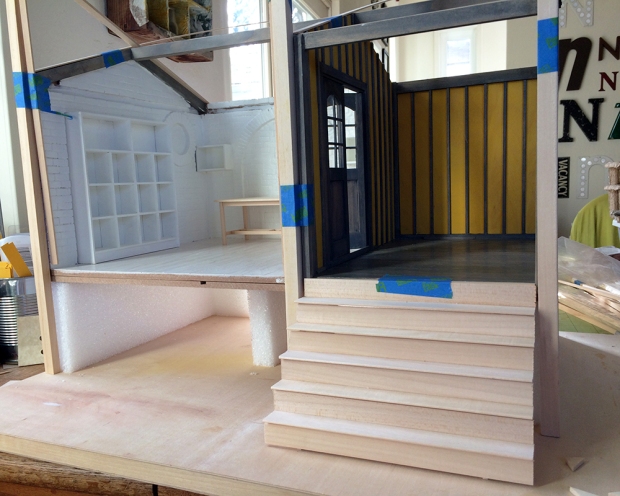
After determining the maximum height of the stairs based on the project board dimensions, I established the height of the foundation, which turned out to be four inches. Using inch-thick styrofoam, I cut and glued it to the bottom of the second base kit.
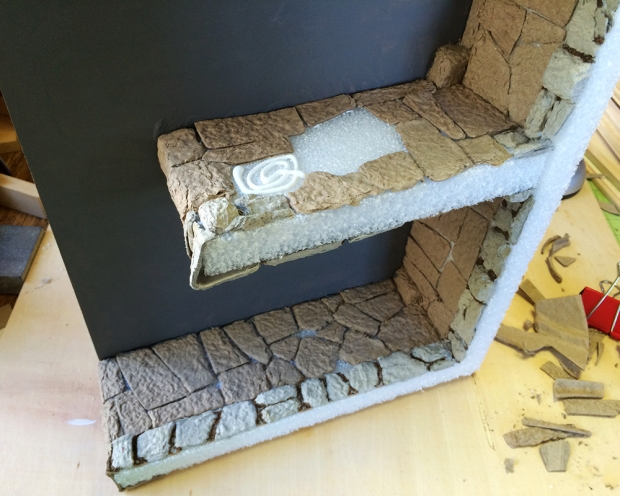
I decided on more rubble and salvage from the 1906 San Francisco earthquake, and was pleased to also repurpose some foundation stones from an abandoned early build. I used the recommended Foamtastic glue, which I’m pretty sure is just an extra-thick tacky, and as a result my thumb joint is sore from *squeezing* the bottle all day.
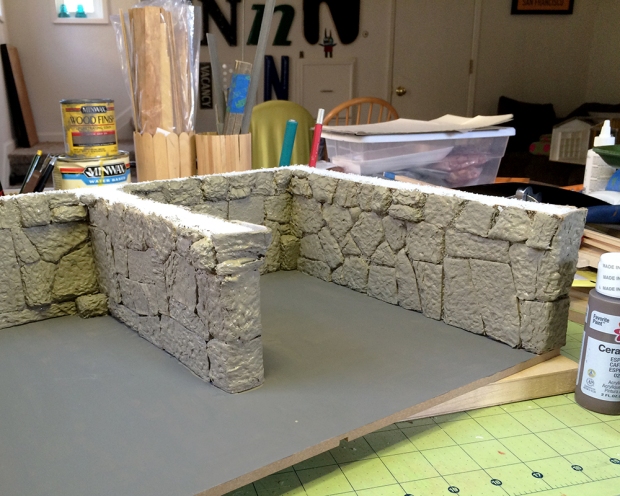
Here’s the upside-down completed foundation, with a first coat of paint drying, an entire two-ounce bottle of Delta Ceramcoat “Mudstone”. (I’ve since added a wash of “Espresso” to good effect, but lost the light and will have to wait until tomorrow to show you.)

Nancy, how did you do the stone wall?? This looks brilliant is exactly what I need for my South of France House!! I would appreciate so much if you shared his…
Marion, I used pressed pulp box inserts, similar to egg cartons but thicker. The bottom row is from wine bottle packing; they were smaller. I cut whole rounded corners and ends off whenever possible; these are the “whole” stones. The rest are just cut and fitted, with a one to two millimeter mortar channel. After the glue dried, I rounded most of the edges with a wood cuticle stick :) The styrofoam itself has an interesting cellular texture and indents nicely. For this interior, barely seen foundation, the paint and the odd bit of moss is going to be enough mortar.
thanks nancy. guess I was hoping that there is ready made texture for this ;-)
but I see: painstaking work – there seems no way around this.
I know exactly what you mean by sore gluing hands. Thankfully it never lasts long.
The stonework looks great so far, have fun working your painting magic :)
Diagnosis: Soregluehand :( And you’re right; it feels better this morning :)
Coffee first, then a trip to the craft store to buy *more* paint (on sale! only US$1.37! yay)
Then: magic.
It already looks so much more interesting with the added height and ‘stone’ foundation. You’re starting to change my mind about this kit, for the better!
Thanks, Christina, and good! This kit easily lends itself to a whole additional storey, but the size of the base board I use, as well as my love of landscaping, circumscribes my choices. Go for it!
I agree with Christina – the added height really takes it to a whole new level. :) I love the wide stairs – I want to sit there and sketch in the sunshine.
We have sunshine today here, BW; come on down! You can sketch and I’ll work on the exterior foundation :)
It looks very realistic. I can sympathize with your thumbs, I’ve done projects before with similar results. Maybe rest them for a day?