Rocks, Cobble, Water Features, Sunset Light

Sea House Conservatory Pier, ready for her water feature!

In preparation for creating the tidal water surge under the Sea House Conservatory, I mixed up a nice ocean green base color and painted it generously on the project board. I made sure the whole 26 x 20-inch base — foam cliff landslide, boulders, cobble, gravel, old tiled patio — was well-sealed with glue or paint to prevent water leaks. Two-inch tall heavy acetate strips were cut, ready to glue to the base to form a (removable) perimeter dam.

I estimated an area about 18 by 18 inches would be covered an inch deep, then used the Woodland Scenics water estimator to see how much product I needed to buy. Two, maybe three bottles?

Um, no. No, no, no. Depending on whether I chose “Realistic ($24 for 16 ounces)” or “Deep Pour ($30 for 12 ounces)” the estimated 180 ounces required 12 or 15 product bottles, costing a total of $288 or $450. For a feature, however awesome, mostly obscured beneath the Conservatory deck, this makes no sense. Back to the proverbial literal project board to drastically reduce surface area.

More cowbell! I mean, more reefs and rocks!

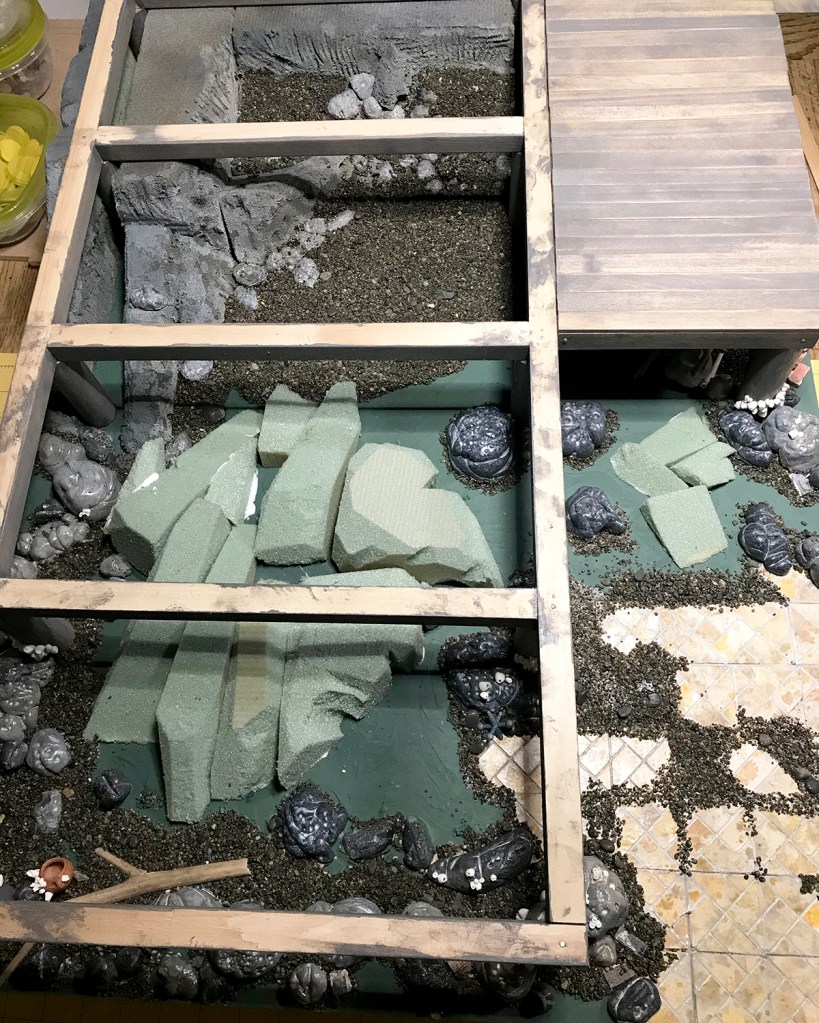
After fashioning more florist foam into reefs and rocks, I glued them to the project board.

Black Model Magic rocks and cobble

Starting this time with black Model Magic, I forged another batch of accent rocks.

Rocks, mid-wash and spray process
The open water feature base is realistically and financially reduced.

The foam shoreline formations were generously sealed and detailed with a few shades of warm and cool gray acrylic and stabbing holes with a pointy thing. All base edges were given a transitional application of gravel, cobble and accent rocks. These were allowed to dry, excess gravel brushed out, and the process repeated.

Barnacles make everything better.

“What are those white cone things?” I can hear those of you looking at this photo on your phone exclaim. What, yes! Those white things are perfect barnacles, crafted by Keli of iseecerulean.com.

Rocks to Keli

(I am not ungrateful. We have a longtime water-influenced exchange going on.)

Sea House Conservatory, under the pier

I did a final brushing and shaking off loose gravel after the glue dried over my (1:1 life) front deck, just as the sun was setting.

Kansas remembers me now
The lunatic is on the grass

You know how it is when maybe you fall a little bit too much in love with your build? That’s how it is for me right now with these sunset light photos. I have about a dozen that made first, even second cut, and they are all epic. One more, please indulge me.

Will be largely unseen

I sighted through all the open viewpoints, and as I mentioned earlier, most all will be obscured once the Conservatory is in place. But I know, and now you do too, what lies beneath.

Sea House Leadlights Interior, Roof; Scarlett

Hello Sea House Leadlights office

The entrance to the Sea House Leadlights office is up a few stairs and across the deck to the left of the fireplace. A set of leaded glass doors opens into a snug but functional design studio.

Details: Terra cotta pot by Braxton Payne. Basswood deck and siding stained with Minwax Classic Gray. Pumpkins made from tissue paper and thread. Boulders sculpted from air dry clay painted with acrylic washes and sealed with ultra matte varnish. All succulents, yucca and other plants hand colored with W&N Promarkers. Many are prototypes; some available as kits at Modern Miniature Succulents + Sundries.) 

Desk and bulletin board

Beneath the half-loft a large tabletop desk has plenty of room to roll out plans and inspiration. Low built-in cabinets with black leather cushions provide more seating, storage and level surfaces for tea trays.

Details: The ceiling lights are 12V modified for warm white LEDs. Bulletin board is made from cork sheet framed with basswood stained to match. Sketchbooks made from my kits at MMS+S. Various meaningful artifacts including original leaded glass designs for other Sea House buildings, and a drawing of a cat by my then 4-year old daughter. Fèves, prized vintage Monopoly shoe, and an anodized earring from the 1980s.

The white-washed brick loft stores window frames, tools, Sea House memorabilia and miscellaneous treasure — as well as the switch (lift the black basket) and battery pack (hidden in a custom box) for the LED lights.

Details: Oh yeah, the baskets and boxes are also available as kits at MMS+S.

A gazebo-style roof welcomes natural light. (I’ll detail more of that happy construction in another post.) I made the 1:144 scale basswood model of the source kit for the original Sea House Pavilion, built some years ago. The Egyptian cat is a porcelain fève. Best of all is the vibrant painting by Jim Tracey that commands the studio — also another post.

Finally, of course, Scarlett. Here she has somehow managed to fluidly infiltrate an impossibly small entrance to the Sea House Sea Rise Pavilion loft (my ongoing remodel of the original 2013 build.) I swear she does these things just to remind me she can.

Oh, how she makes me laugh.

V: Vagary

V is for Vagary. Fluctuation, variation, quirk, peculiarity, oddity, eccentricity, unpredictability, caprice, foible, whim, whimsy, fancy.

I can’t think of a better word, or set of synonyms, to describe the new 1:12 scale echeveria kit available now over at MMS+S. There are no fewer than five leaf sizes and shapes that combine to make three sizes of a charming pointy-leaf echeveria. I’ve redesigned the build method, too, to start on a fine paper-wrapped stem wire (included in the kit), which is perfect for armatures (gnarly-armed structures) and general ease of shaping the plants.

Here is a bushel basket of prototypes, using both of the base colors — white or apple green — colored with alcohol-based markers. (If you want true reds and yellows — or blues and purples — order the white stock. If you’re good with more muted tones and want to spend less time coloring, choose the green :)

Possibilities of color combinations are endless (and fun).

This is a versatile kit, and a form to make a succulent wreath is available soon!

Let Scarlett’s tail and rabbit feet, seen here in complete repose, be your inspiration.

I recently re-found this unfinished Henri Rousseau-inspired collage panel, and glued it to the side back of the Modern Miniature Succulents + Sundries set.

The MMS+S set is in disarray, like many aspects of my life, but potentially still functional.

Zoom out now, please, to 1:1. The former owners of our house built this charming, funky wave-topped gate (seen here from the back). But, inexplicably, they painted the front of it the same dispirited brown as the rest of the decks, and completely ignored the back. For four years, it has *nagged* at me.

Yay go me. Here it is finished in four shades, by the light of the silvery security beacon.

Albie and I survey the change. You can just see that sad brown deck color peeking out under cat and mat.

This is the old hardware, atop the treacherous birdbath pedestel, for those of you/us interested in these things.

And finally. Keli and I have been challenging ourselves to … not let the bastards drag you down draw a random thing and post it on Instagram, until, for each of us, momentous events transpire. (For me, that’s undergoing replacement surgery of both hips, on 01 October, 2018.) I have chosen Crayola and ink as my drawing medium. We are #messy_k_enge and #curlymuenich, if you care to follow along (+also under our regular names @iseecerulean and @nancy_k_enge). We are expecting phat coffee table art book publishing contracts to swamp our respective agents.

How could they not?


Prototyping Complete

purple

Feeling confident about the rightness of the basket kit patterns, I move on to test-coloring the white base cardstock. My charming husband gifted me a set of Winsor & Newton water colour markers, and I’ve been eager to use them. This is, um, not exactly — nor even close to — fine art, but watercolor tints differently than either stain or alcohol markers. I used an intentional kind of crosshatch to fill the larger pieces. Gorgeous color/colour, yeah? W&N Mauve 398.

pear

I built the purple mauve watercolor basket, and moved on to an alcohol marker. These bleed and blend much more readily into the cardstock. W&N Pear Green Y635.

most

Here are our happy fellows to date. In this picture you can see the difference between the heavier-weight yellow basket, and the slightly lighter-weight, tinted and white cardstock ones.

duck_egg_blue.jpg

I realized that tinting the outer edges of the lid pieces (even though they are eventually covered) helps mask any gluing misalignment, so had to test-make one more basket. This is W&N alcohol marker Duck Egg.

green_blue_rain

And here are the last two basket prototypes, with some hen succulents, held up to the last of our stormy, freaky light. I noticed a similarity between the terracing of our wee hillside backyard, and the woven fabric of the baskets. Huh.

Newsletter, Calendar, Party

calendar2017_project

There’s a new issue of my newsletter Cut, Fold + Make going out tonight that includes a modern miniature calendar for you to make.

calendar_gluing

It’s a quick and simple project.

calendar2017_finished

You can sign up to receive it with the newsletter link on the right.

mms_calendar2017

It’s a good  way to keep track of yourself in sequential time.

mms_party_123116

And, there’s a party going on to celebrate the new year and new pergola being built at Modern Miniature Succulents + Sundries. All the furniture from Sea House Warming Hut has been dragged over, and there’s a beach driftwood fire blazing, as well as festive beverages. Come on by! It’s been too long since we’ve all hung out together.

godzilla_123116

PS: Godzilla will be there.


hens test

hens_holes

Hen and chicks are one of the first succulents I fell in love with, so this design is dear to my heart. And I felt like a right genius because I figured out how to get the machine to cut a hole in each center. It is not an automatic process and involves what Cricut calls “attaching” layers. (The above holes are three points in diameter; I’ve since upped it to four.)

hens_fun_part

This is the fun part. Removing the waste from the sticky mat makes a musical plinking sound that is very satisfying. And as I soon learned and as Nora suggested, it’s far easier to remove the cut shapes after the mat has been “de-sticked” a bit — which seems to happen with use.

hens_shaping

Color test and shaping. The little point on the end of each leaf adds such sweet realism. My inspiration:

live

These guys are in a bit more shade now in my early winter backyard, so they’ve lost most of their edge-leaf color.

hens_proto

Prototype hen. Next up is to draft a smaller-leaved pattern set for the chicks, so we can build happy succulent families. This one is about 5/8-inch (16 mm) across.

hens_storage

And this is how I’m keeping all the very many parts organized and identified. I’ve long kept a stash of these useful little containers from takeout food, but ran out quickly. Dollar store to the rescue! Ten cups with lids/$1. I should probably cost them out in greater quantities :(


New Kit

scarlett_sv02_112716

Listed another kit in the Etsy shop, a larger, more-specimeny succulent that pairs nicely with SV01. Continued heartfelt gratitude and thanks for your warm wishes and interest. I wish I had like a whole line plan to lay out — and I do! In my head! — instead of this kit-by-kit piecemeal showing. And soon, on offer, completed specimens, in some of the most wonderful containers I’ve ever seen! However. I am learning by doing, and this is bootstrap crafty business making. Rhetorical question: would we have it any other way?

First Listing

sv01_spray

So pleased to announce the first kit is available over at MMS+S. I expect I’ll be making editing tweaks for a while, in between assembling and listing new kits. Potted specimen succulents and sundries coming real soon. Heartfelt thank yous to all who showed interest. Happy making!

Just Kitting

sv01_kitbag_112216

First article! Well almost. I’m waiting on the brown kraft paper to arrive, and, having just finished re-re-shooting the instruction photos, to get those printed.

sv01_kit_contents

What’s in this kit? There are options for white, cream or sage green stock, as well as for me to color the leaves (US$5 extra; I may live to regret it :) One kit makes seven stems, with extra leaves to practice on. The example is the yellow-edged green variety, but of course you can paint them as you like. There’s a special hashtag to use if you post on socials, so we can all see what people are coming up with.

sv01_making

sv01_finish2

sv01_finish

mmss_logo

Need to finish writing *all* the stuff for the Etsy listings and blahblah. And then let it go live. Gulp.

First Packaging Prototype

first_packaging2_111816

Exciting times here in Nancyland. Been researching and getting in supplies for packaging and shipping, and working on the graphics for labels and such. Need to reshoot two four photos for the first kit instruction sheet, and that’s done. Then do glamour shots and write product descriptions for the Etsy shop, and actually list stuff for sale. Getting good response to the newsletter offering — thank you, thank you — and Volume 01, Issue 01 drops the first of December. Whirlwindy!