First Packaging Prototype

first_packaging2_111816

Exciting times here in Nancyland. Been researching and getting in supplies for packaging and shipping, and working on the graphics for labels and such. Need to reshoot two four photos for the first kit instruction sheet, and that’s done. Then do glamour shots and write product descriptions for the Etsy shop, and actually list stuff for sale. Getting good response to the newsletter offering — thank you, thank you — and Volume 01, Issue 01 drops the first of December. Whirlwindy!

Newsletter, Walnuts

I’ve been wanting to publish a newsletter for some time. Printed magazines have always been dear to my heart, and I see an email newsletter as a cost-effective way of sharing my interest imperative of a daily creative practice — however it occurs to you — as essential human activity, without all the adverts. I’m using Constant Contact for delivery, in part because I’m familiar with it from my volunteer work with Pacifica Beach Coalition, and hey, start with what you know.

walnuts_111716

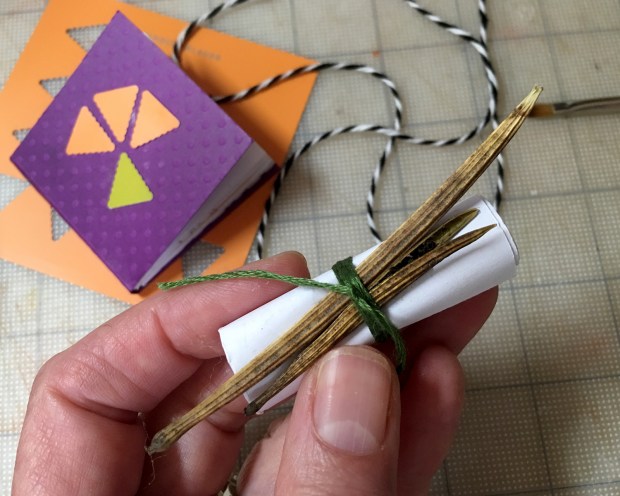
Years ago I made an advent calendar for my daughter, when she first moved away for college. It was a garland of shelled walnuts containing tiny treasures glued over a length of ribbon, meant to be re-cracked as the days unfolded. This is a perfect project for miniaturists, for who among us does not have an overflowing stash of tiny treasures?

walnut_navel_111716

Construction is easy enough. Get a pound or so of jumbo walnuts in the shell.

walnuts_split_111716

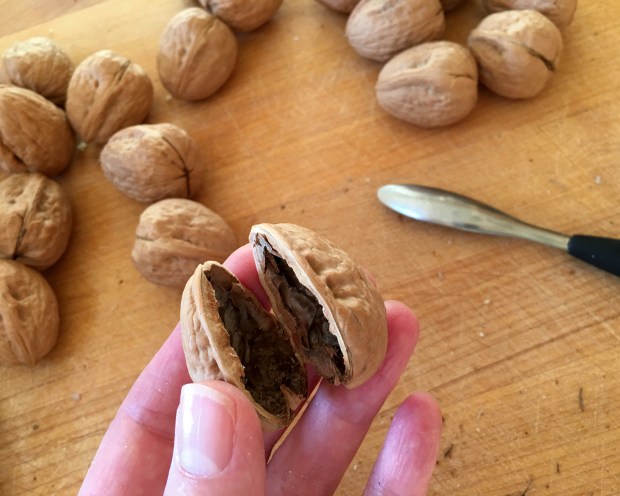
Split them cleanly open, and remove the good bits. (It’s just weird to call nuts meat.) Share with your squirrels and birds or save for cooking/snacking. I found a shellfish fork to be the handiest tool for all tasks, but use what you have. Keep the shell pairs together.

walnut_helper_111716.jpg

Ensure you have a dedicated helper.

treasure_111716

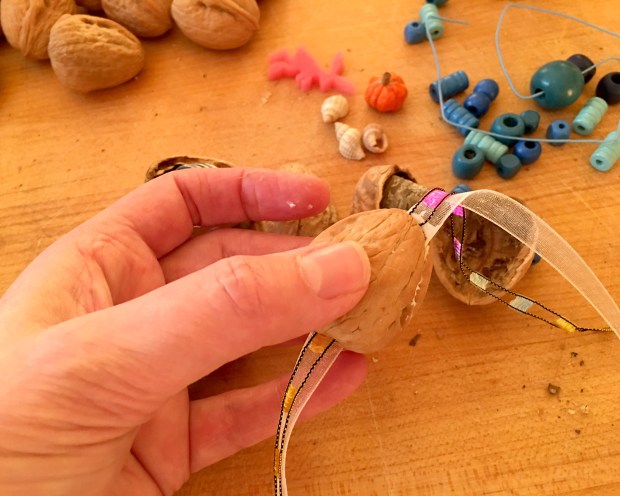
This is the really fun part. Depending on to whom you intend to give this, go through your stash and find small treasures that will fit in a walnut shell. This one is for my almost-four-year-old granddaughter.

more_treasures_111716

It’s helpful to test fit and line up your treasures so you can roll with assembly. Make sure you keep your walnut shells paired!

glue1_111716

A thinnish, flexible ribbon or raffia works best. (I’ve needlessly complicated the process here by using a sheer ribbon and a novelty yarn, but both have sentimental value :) Dot glue on both sides of the shell, sandwiching the ribbon, and realign the cracked shell edges.

holduntildry_111716

Hold until dry. Think about good things.

repeat_111716

Decide a pleasing interval between walnuts, and repeat the process for the number of days you wish to advent, depending on what you’re counting down (or up). The finished walnut garland can be hung in any number of ways. Of course you’ll want to give some consideration to the contents vs. the force necessary to re-break the shell, but it’s pretty easy.

If you’re fancy, the walnuts could be gilded or embellished with numerals. Or glitter… or rose thorns. You get the idea. Evoke.

For me, cracking and shelling walnuts returns me to my childhood, when every home had a nut bowl on a living room side table, always available for a snack. Holiday baking involved conscripted labor. Our job as kids was to crack a very large bag of walnuts, almonds, pecans, hazelnuts, the odd Brazil nut — our mother would never indulge the cost of pre-shelled nuts! — and extract the usable parts. As I recall, whole walnut and pecan halves earned a dividend. These memories are imbued with a happiness of shared industry and rich nut tidbits.

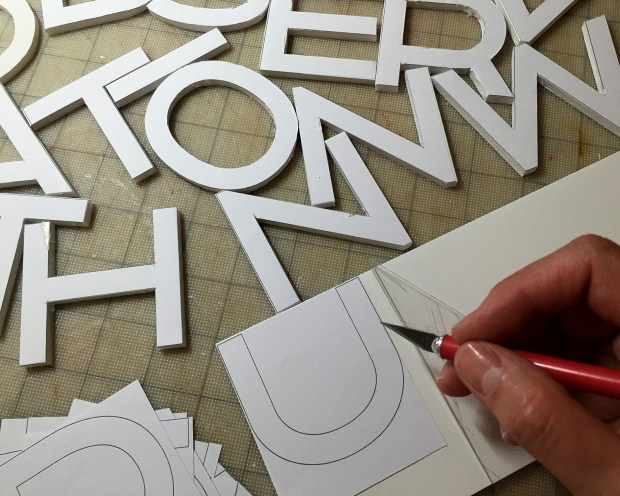
Anyway. Projects, ideas, like this are what I have in mind for my newsletter content, as well as quick inspirations, fun facts, helpful hints, and links to relevant, deeper content around the subject of being a heartfelt creative person. Sound interesting? There’s a clunky link in the sidebar to subscribe, as well as a new “Newsletter” page with a contact form. Obviously I’m still working everything out. I’m thinking a once a month issue to begin with. Interested?

Woods Class

afzelia_110216

I’ve been taking a wood skills class through adult education at Westmoor High School. My neighbor Lynn got me interested. She’s been taking it for untold semesters. Basically what it gets you is access to a full wood shop, with all the giant, scary full-size machines, an accomplished instructor, and classmates of varying skills and experience.

It is awesome.

For us newbies (and others) our instructor had secured a very good price on a lot of rough lumber called Afzelia. I’d never heard of it before. Turns out it’s a very well-behaving (his words) and interesting wood. We’re all, I mean, we newbies (there are many serial takers of this class) are doing some variation of a table with four legs mortised-and tenoned into rails, and a top as yet to be determined…

Above you can see two of my 1.75-inch square table legs, after being rough cut, jointed, planed, re-sawn, and then planed to dimension. My professional woodworking friends, I beg your forbearance. Observe the color and grain diversity! My sneaking suspicion is that there is a reason this wood is not more widely know, but so far, for me it has been a revelation.

mitre_tip_110216

At my level, woods class involves a lot of waiting, for machine time or instructor instructing. Fortunately, there is an awesome library in the classroom.

mitre_tip2_110216

These tips, from a book I’ll reference next time (Wednesday 6–9pm) are insight and solutions I thought directly helpful for us small-scale builders.

I approached this class with trepidation, but with a hopeful sense of cross-pollination? Miniature wood-working skills absolutely do not apply. Maybe other than artistry, attention to detail, tidiness, respect for sharp blades, and willingness to let glue dry. Anyway, I’m loving it.

+++++++++

Echeveria!

deck_ech_102316

Been making California poppy and echeveria planters for a little while now.

ech_poppies_102316

ech_flat_pots_102316

I first learned how to make echeveria from this wonderful tutorial by Annie Christensen of We Love Miniatures. She uses brushed pastels at the end to tint the leaves. All the succulents in the Argo Wool Works foundation plantings were made using her method.

Lately, I’ve taken to using markers to tint and edge the various shapes punched from cardstock painted with acrylic wash, as seen above.

Also, do you see those footed flat clay planters? They’re from Falcon Miniatures, made in Thailand, and seem no longer available. If any of you know a source, I’d be very stoked :)

new_ech_012316.jpg

This afternoon I was fooling around, searching for some new shapes from the limited punches I have. I covered a bottle brush seed pod with overlapping petal shapes, and set that in a base of cupped leaves. Then I stuffed an emerging flower shape in the apex hole — I really need to look up the correct botanical terms — and… a new, fairly convincing succulent/cactus hybrid variety was born! I’m quite pleased with its appearance and will post a step-by, after I get a manicure :)

stretch_joy_102316

This picture of Scarlett nuzzling into Albie expresses my joy. I expect one day to stop posting so very many cat pictures, but she is so stinking cute and delightful…


Equivalents Homage

equivalents

Inspired by the great 1938 poster in my wood working class, I was motivated to make my own version for picas and points. It’s the traditional measurement system of graphic design, but it also works really well (as I’ve pointed out before) for 1:12 scale building plans. Six picas to the inch, twelve points to a pica. Enjoy :)

New Project, Poppy, Magnets

cutting_080116

Work is underway on a new mixed media piece, large (for me) at 24 by 36 inches (61 x 91 cm). These letters are about 2.5 inches tall (64 mm) and being cut from foamcore.

punched01_080516.jpg

Poppy the Fairy is being kept busy with her correspondence. These are two accordion books, meant for Ava and Aria to embellish, made from watercolor paper and simple punched shapes. That’s Poppy’s new sigil.

punched02_080516

… As well as Ava’s name rendered in triangles, and another tiny sketchbook for Lynnie (at proper 1:12 scale). Her’s from last week was, um, appropriated by her associates :)

do_book_00_081316

This week, Poppy made a two-inch square book to answer some of the girls’ questions: Can you do ballet, like me? Do you eat snacks? Tucked into the reply scroll are California poppy seed pods, because one of the things fairies do is gather seeds.

do_book_01_081316

Inside the book are quick ink and watercolor illustrations with text. Here are a few of the pages, listing some of the things fairies do:

do_book_02_081316

do_book_03_081316

do_book_04_081316

I can perhaps see a series, as my understanding of the fay way grows :)

MLR_magets_080616

Maddie Lou spent the weekend with us as her parents enjoyed a night in the City to celebrate their anniversary. Here’s Maddie working on a surprising and spontaneous new deployment of her beloved magnetic blocks in the sun room.

MLR_magnets_080616

The final arrangement. Can you tell her favorite color is blue?

So awesome on so many levels :)

Plastic Litter Collage

frame00_072816

I added quarter- by half-inch pine to the back edge of the thin plywood base to stabilize it and add more surface area to attach the frame to. The plywood itself is salvaged from the crates I built to ship my builds when I moved three years ago :)

frame03_072816

After painting the inside frame pieces with two coats of semigloss latex, I cut the two-inch ply lengths to fit and glued them on the base, butting the corners. I used binder clips to hold the frame to the pine strips and a flexible strap corner clamp thingie to hold the frame square while the glue dried. A first coat of paint dries with Albie’s supervision. Tomorrow I’ll tap in tiny nails to secure it all, then fill the holes, sand and paint, sand and paint, sand and paint. And hopefully this weekend I’ll have collected more plastic to call it done.

California Poppies

poppies_start_040216

Native poppy season is well underway here in Northern California. One of my art supply stockists (thank you, Britain, for that great word) was selling Letraset markers for $0.67 (!) so I laid in a fresh supply of flower colors. The 3/16-inch (4–5mm) petals — four per flower — are punched from inexpensive 20 lb. paper. Stamens are a thin strip of paper tinted deep yellow, cut into a fine fringe and rolled around the stem tips. I’m using 28-gauge paper-wrapped wire cut to approximately .75 to 1.25-inch (19–31mm) lengths.

poppies_02_040316

Here’s the first clump of poppies in with the lavender. The color with these markers when dry is a bit muted, so I’m going to mix in some Sharpie for vibrancy in subsequent propagation. I’m using small mounds of preserved moss to suggest their foliage, as I did on the Sea House Warming Hut living roof. There is continuity in Nancyland :)

poppies_040316

The yummy bench is from Peter Tucker, found at the Good Sam show a few years back.

You are welcome to come sit and watch the gardens grow :)


Lavender, Ties

lavender_031916-1
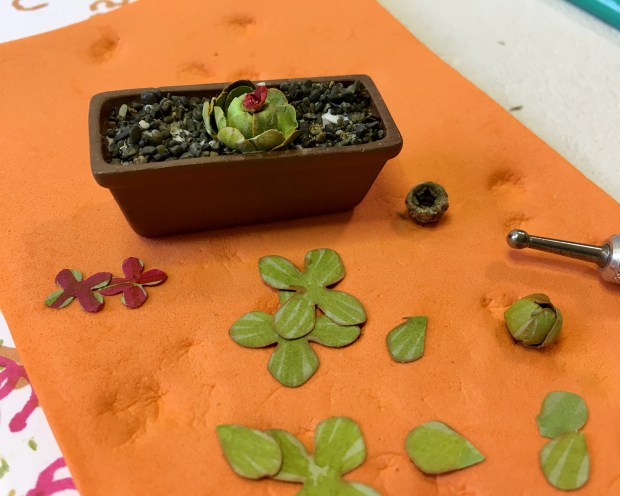
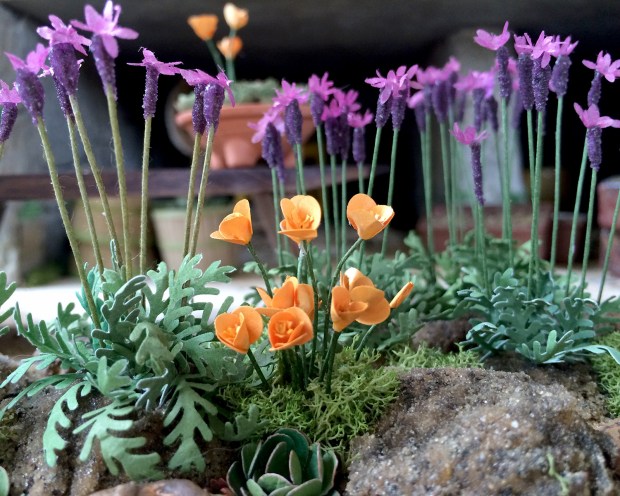
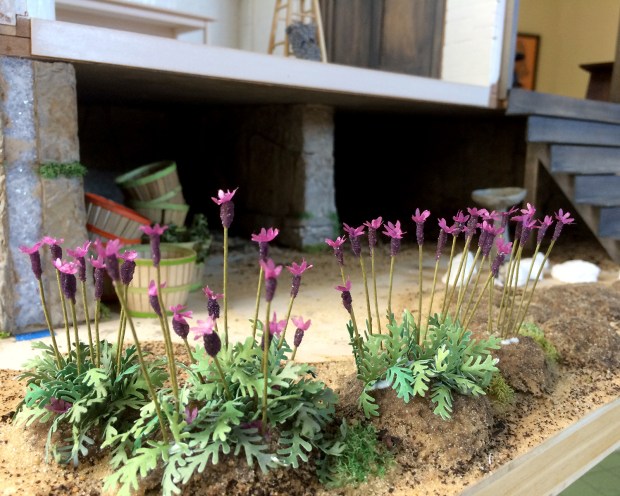
I mentioned that Argo Wool Works also grows lavender. There are a few good approaches to making miniature lavender, and after a thoughtful review, I’ve adopted a hybrid technique. This is always the question in miniatures: how best to convey a feeling, an illusion of the real thing? Absolute adherence to reality, or a simpatico synthesis of appearance? Answers often surprise me, as did this lavender.

lavender_031916-2
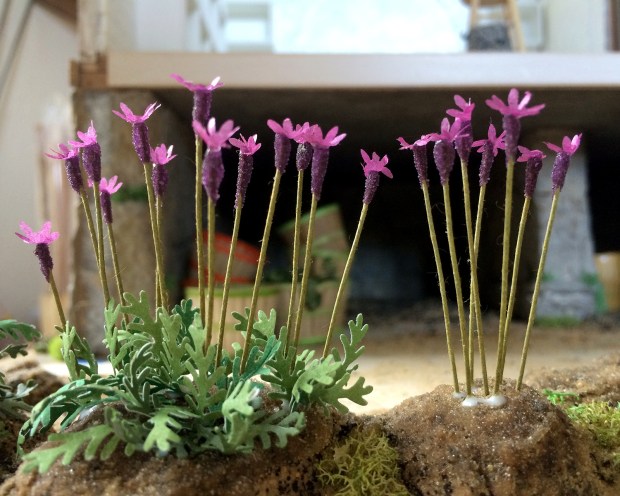
These are the start of the demonstration lavender beds outside the AWW showroom, as planted in the egg styrofoam and sand-covered mounds established earlier. I’ll post a more step-by-step later, when I’ve more available time. I think the method is worthwhile :)

The final observances of my family’s multiple March birthdays have been celebrated. I was delighted to receive an unexpected gift from one of my oldest, dearest friends, who noted my quest for fabulous silk ties with a large bag of said items. Her husband — another oldest, dearest friend — is a professional wearer of ties.ties_031916.jpg
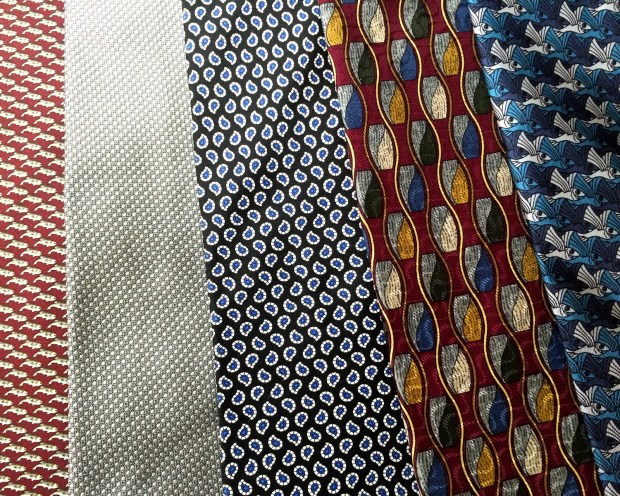
These are the top five I pulled out for the squiggly vintage Chippendale sofa, and/or throw pillows. The far left is out of focus, but is a delightful fish pattern. The next is an exquisite gray/black circular motif… on through a classic understated Paisley, a retro-looking I don’t even know what, and a brilliant Escher tribute.

Adding to the Spring bounty is another bestowal of wood veneer and samples that would have otherwise gone into landfill, from family member Tony. This is a large roll of oak veneer, and samples of bamboo, cut both horizontally and vertically.more_veneer_031916So, so beautiful, and interesting! May your cups runneth over with unexpected gifts and bounty to share.

The Thing Missing From My Life

Short answer? Paperclay. Long answer follows.

back_wall_030516

I settled in to finish the long back foundation wall, literally before the storm and power went out. Above you see the carton materials wrapped from the left side wall and primed in Ceramcoat “Mudstone”, then the beginnings of the long traverse using various parts of egg carton. Then I noticed something.

A while ago, our thoughtful reader and observer Barbara W. had sent me a mold from Woodland Scenics. Although sized as “boulders” it occurred to me that at 1:12 scale they would make excellent rubble, the kind I was using in the foundation.

paperclay_rocks_030516.jpg

I reviewed my on-hand options and chose a pouch of Creative Paperclay. I had never worked with this material before, though it was on my list. I chose some of the larger boulder forms and filled the mold. I forgot about it until I started the back wall foundation masonry. Then I noticed that the molded boulders had a similar texture to the carton materials I was using. Like, really similar.

The dried paperclay is a remarkable material. It is extremely stable and lightweight, easy to trim, and as I was soon to find out, paints very well.

back_wall_rocked_030616.jpg
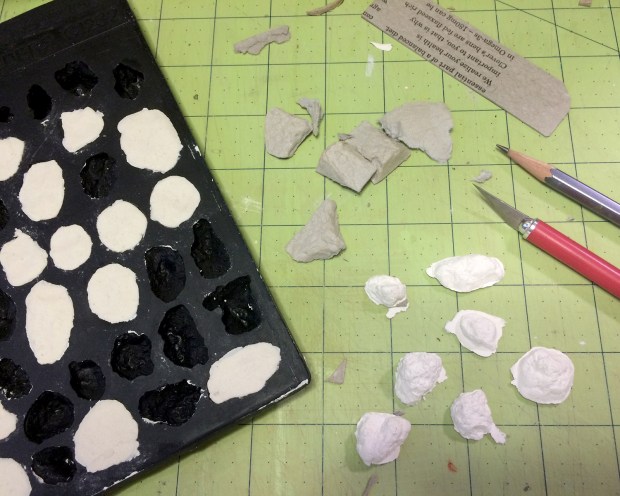
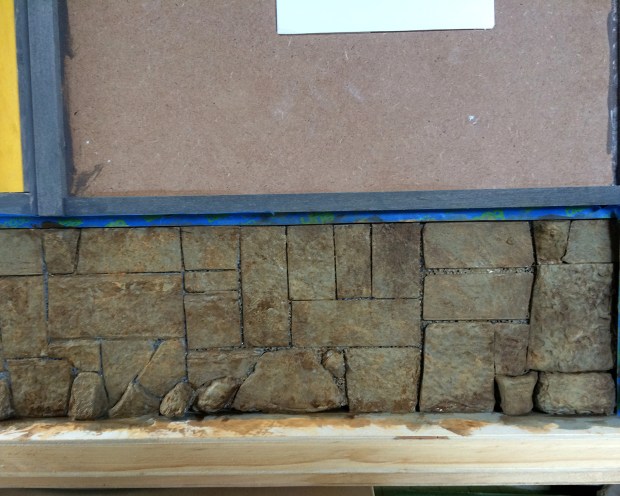
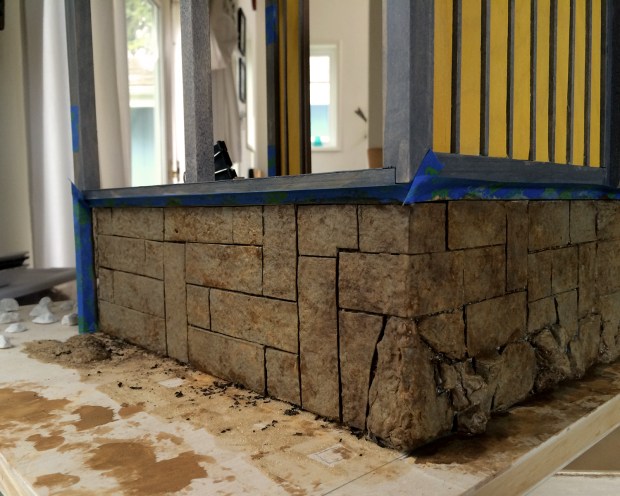
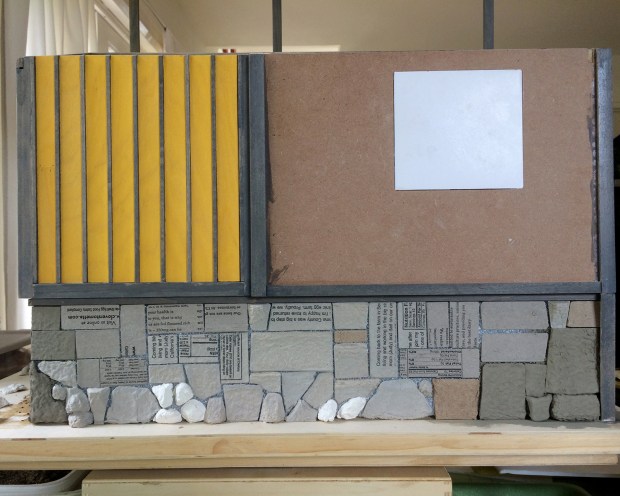
I reloaded the mold with the full set of rocks in paperclay to use around the rest of the foundation, and finished out the back wall with the few that had already dried (those in white), along with egg carton and packaging forms. It seems to take two or three days for the paperclay to dry thoroughly.

back_wall_washes_030616

I applied the same set of acrylic layers and washes as the interior foundation.

corner_030616.jpg

Here’s a dramatic corner shot.

back_wall_030616

And the entire finished back foundation wall.

back_moss_030616

Although there is additional touch up and detailing to add, this needs to dry thoroughly. I could not resist gluing in some moss, though, to make it come alive. Thanks, BW, for the gift of the mold and allowing me to discover paperclay. The fun has just commenced.