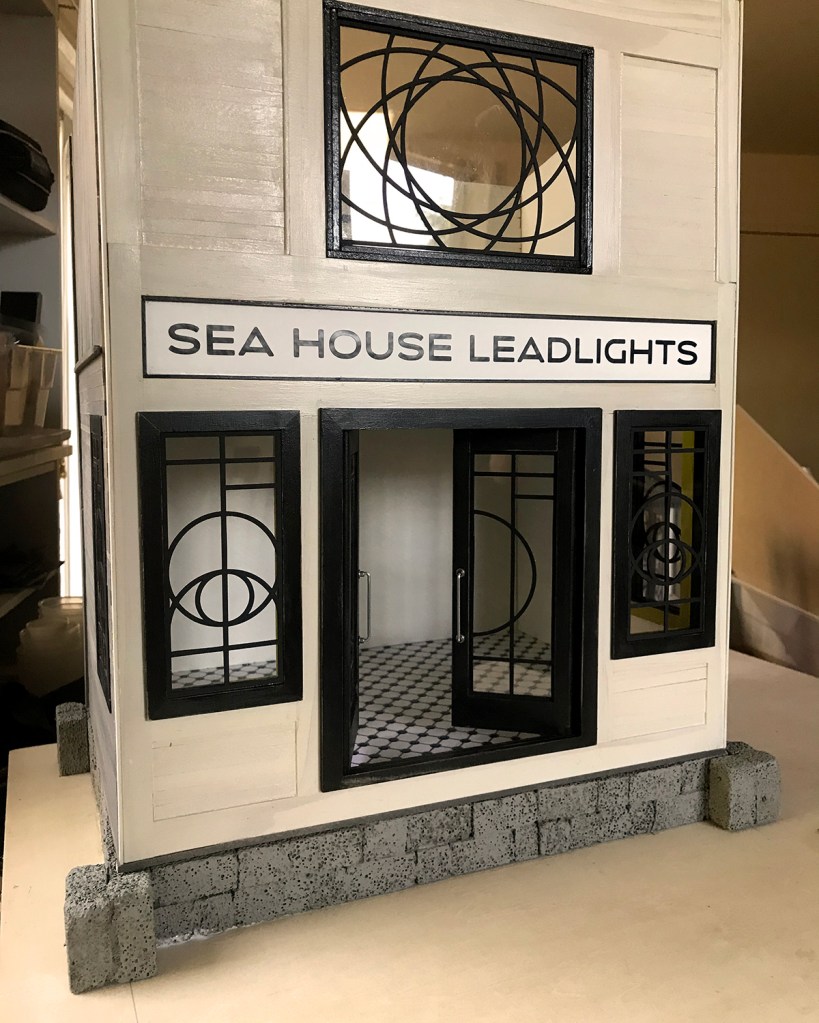
Well this is exciting! Studio Inki is moving into the old Sea House Leadlights building. (Leadlights needed more space and moved into the imaginary milking barn near the Warming Hut.) Interior design planning is in process, and will feature an open concept to maximize the abundant natural light and epic views. The famous Leadlights-designed windows and doors will remain. “I still really love them,” enthused the new owner.
At this point, the adobe and brick fireplace on the side deck will remain largely unchanged, aside from a thorough cleaning and new limewash. I’m very looking forward to actually completing the set of Kris Compas estate chair kits with the Pescadero thrift store dress fabric upholstery… very Studio Inki.
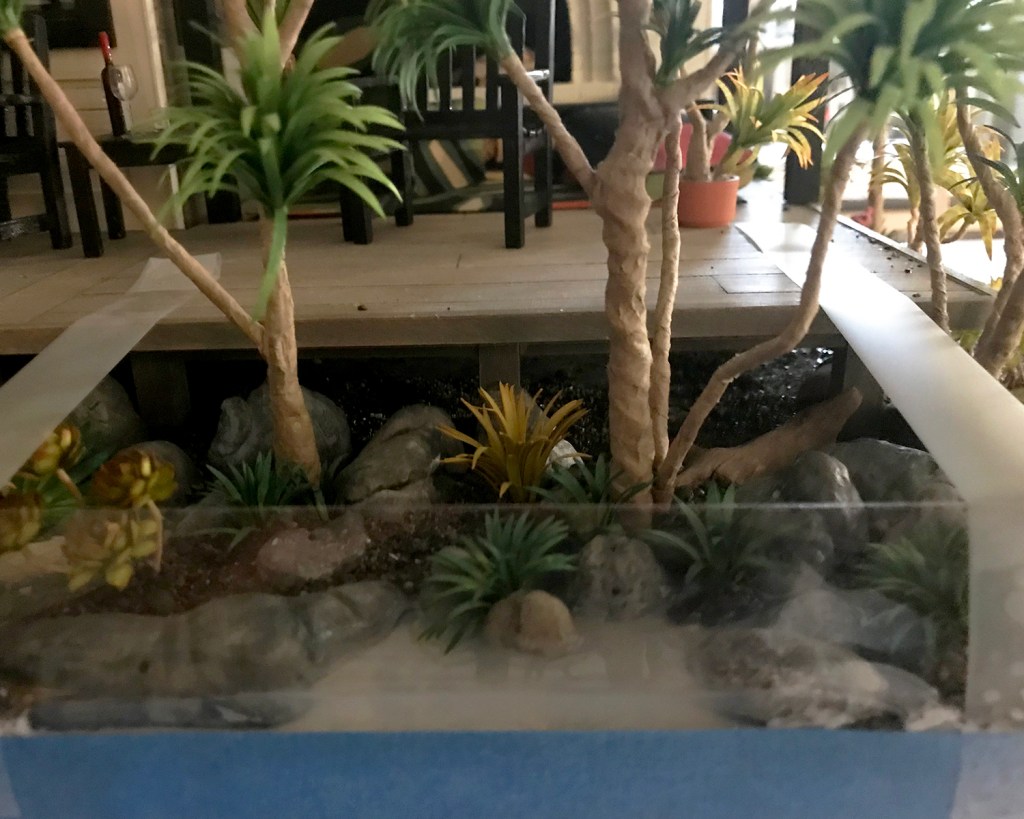
Although this photo was taken during high tide, this is the water feature look I want to emulate on the Sea House Conservatory low tide build.
Sea House Leadlights
After watching countless hours of video demonstrations from a variety of sources, I started my experiment with a small area at the front of the Leadlights landscaping that seemed natural for a water incursion. I glued a 2-inch tall length of acetate to the project board to form a dam, several inches longer than the intended 4-inch-wide pour, reinforced with masking tape below and tape holdfasts above.
First pour
Several deep breaths and I poured a scant quarter-inch of Realistic Water ™ from Woodland Scenics into the prepared area. Recommendation is an eighth-inch, but hey, it pours fast. So far so good.
Not any different 5 minutes later
I did the same prep on the Conservatory project board.
Constructing a dam around the Conservatory pier
One tricky situation encountered is when any element of the landscaping extends past the base, even a little. I had some time to consider ways I will do it differently next time, as I held the acetate to the base while the glue set adequately.
The indispensable Hand Clamp
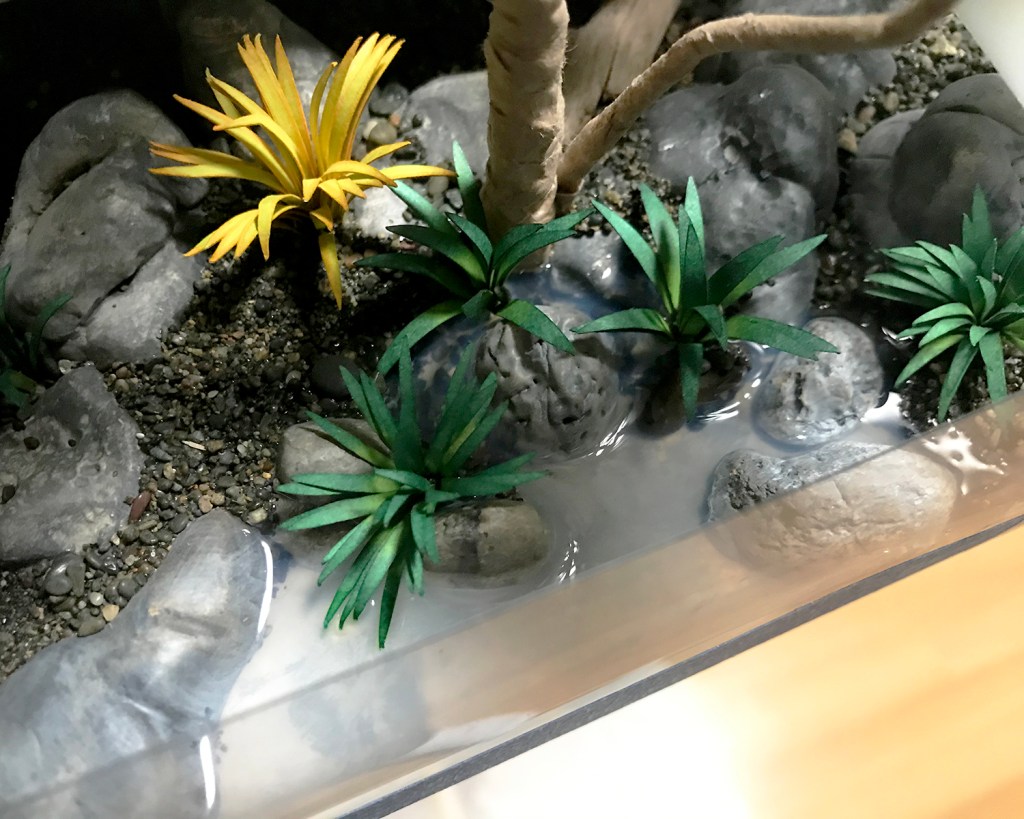
When the glue seemed set, I boldly — yet delicately — poured the first course of water into the prepared base. Altogether, five or six individual glugs into each tide pool and basin.
The first pour
Unsurprisingly, as I looked and marveled at the swampy effect and the no-going-back-nowness, a few small, very slow leaks began to develop. I used wide painter’s tape to further seal — more on that later — the acetate dam to the base. Checking again about two hours later I added more tape, and also noticed a few small areas where the glue I had used to cement the gravel and boulders to the base seemed to be turning opaque white.
Hmmm.
The recommendation for the water product is to let each layer dry at least 24 hours. It was very late by this time, so I called it a night very early morning and went to bed.
Hmmmmm. Should I be concerned?
Next morning, not 24 hours later, I was encouraged to see the water was turning clearer, but the small white areas were still present, noticeably in the transition areas of gravel I had applied a few days earlier.
What is causing those weird areas of white in the gravel?
So I re-read the product label instructions.
What?!
Not for use with PVA glue. I’ll shorten my whole lengthy tirade — who doesn’t commonly use PVA glue? Why wasn’t this the very first caveat on the label, and why was this condition never mentioned in any of the company’s instructional videos on use of the product, etc… and lots of swears and unkind, rude assumptions and declarations. But then there was the offhand “Cure above 70°F.” Thankfully I have a wise and patient bitch buddy to vent to with whom I can vent. You know who you are are.
Then I calmed down enough to embrace that since there was nothing I could do about it now, I’d wait and see what would continue to happen. After all, it had not been even 24 hours yet, and it is a rather larger area and blah, grumble, blah.
I wasted more time did more research on pouring water, this time with a variety of mediums and preparation techniques, and even grubbed around in some forums, which I detest, and learned that yes/no there are some/not any problems with PVA glue that can be gotten around by sealing everything with — and here again suggestions vary — some sort of varnish, and, most valuably, some clever ways to build and seal dams for water feature success. One involved swamp water.
Time passed, and my watery problems with this product mostly resolved themselves. I continue to steep myself in the experiences of others.
Leadlights water feature, with live edge!
I did a second pour on Leadlights, and a second and third pour on areas of the Conservatory. Above you can see the dam removed to reveal the fully cured water. (One of the plants bled a little color into the water, but I don’t mind.) I wanted a “live edge” to the water, and used an Xacto knife to carve away the lip. The project base itself will be edge-banded with thin basswood for a finished look :)
I have made a water effect!
All in all, I am happy with and consider the results a success. I’ll know so much more on the next one.
Check out the light shimmer on the right pier piling, a reflection from the late afternoon light. Magical realism, which validates my efforts :)
I’ll leave you with this image found in Bolinas, on the estuary marsh/riparian transition on a winter afternoon hike at low tide. (Very low and long ago for this guy.)
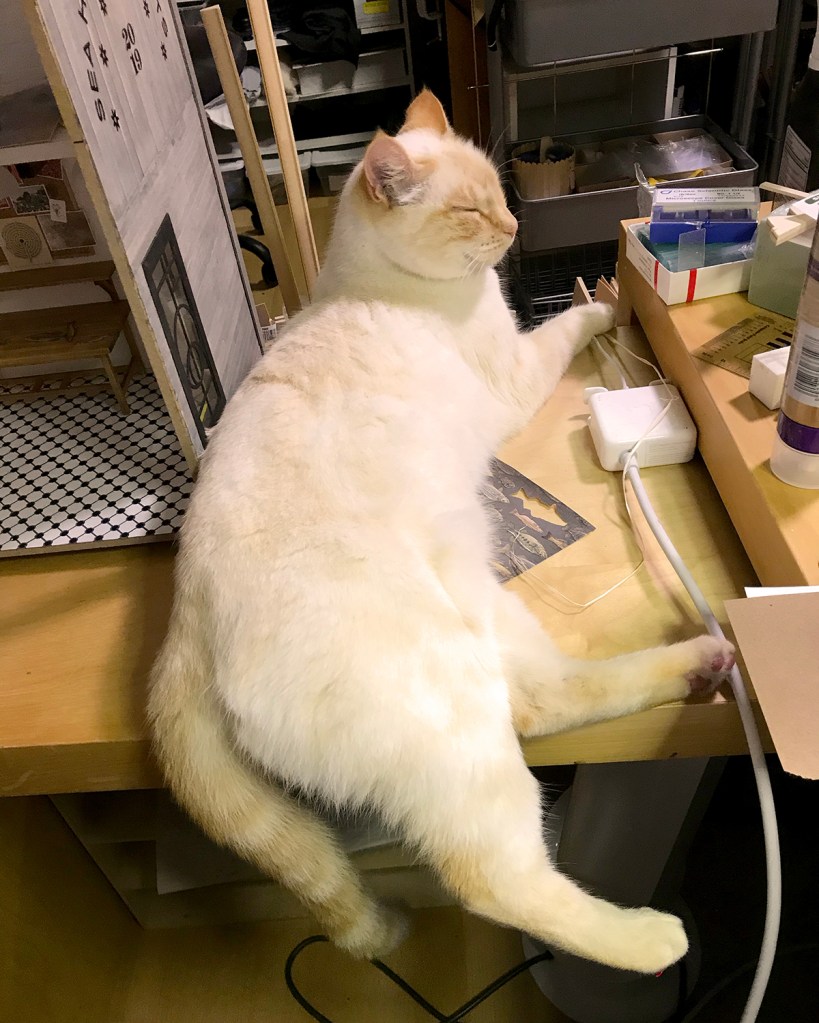
Albie oversees receipt of Serendipity Shed base kits, 16 August 2019
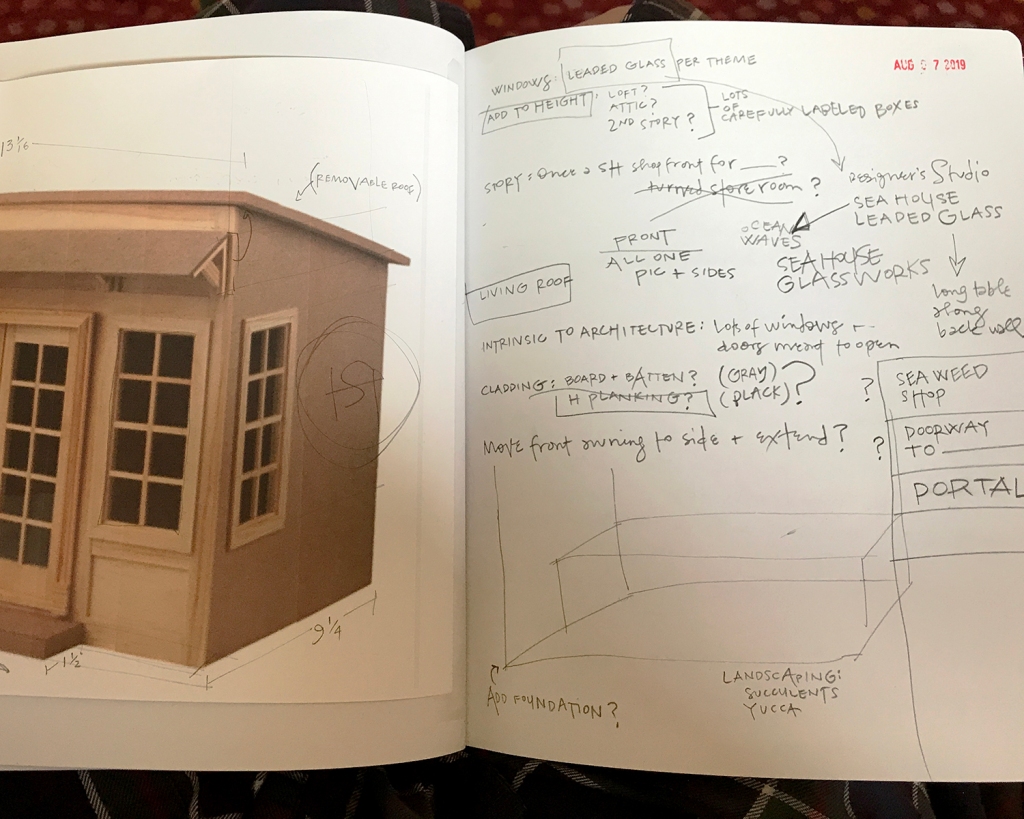
I thought it might be interesting to review building highlights of the Sea House Leadlights studio office, from start through submission. (Can’t really say “completion” because things never stay done ‘round here.) There are links back to original posts — if any were made — with more details. I wasn’t very bloggy :)
First ideas
I spend a lot of pages thinking, sketching, dreaming, considering and working out dimensions and story.
The starry floor in process
The first floor idea, though fun to design, paint and assemble, did not work well in the space. So it goes.
Two base kits mashed together
Height was added to the starter kit with parts from a second. I like to retain recognizable elements of the kit, so the roof angle and footprint, as well as door and lower window placement remained unchanged.
Loft wall detail
I glued cold press 140 lb. watercolor paper to the walls for texture before painting, and added a whitewashed aged brick back wall in the loft.
Adding siding to the new frontHalf-loft installed, supported by faux beams
I opted to make the front façade removable as well as the roof… this makes it so much easier to photograph the interior.
Bench tops and bottoms
I cut the built-in benches from 1/16-inch basswood on the Cricut Maker. These were glued together and supported with 1/8-inch dividers.
Interior space begins to come togetherTree Frog green was the only possible finish color, with black leather cushions
I thought and sketched about the window designs for some time. The Pavilion is bubble-themed; the Conservatory celestial… for the Leadlights design studio I went Egyptian Deco. Mostly sort of.
Sea House Leadlights front doors and front/side windowsSea House Leadlights upper window
The upper window is a stylized scarab. Very.
The “leading” designs for the windows are cut from lead black cardstock, glued front and back to the plexi, then framed in black on the exterior (and tree frog on the interior). I like to see wood grain, so I use a 1:1 ratio of acrylic paint and staining medium.
The scarab window at night
If one looks straight on, the window frames the bricked loft wall and the old Sea House logo. With sacred scarab wings.
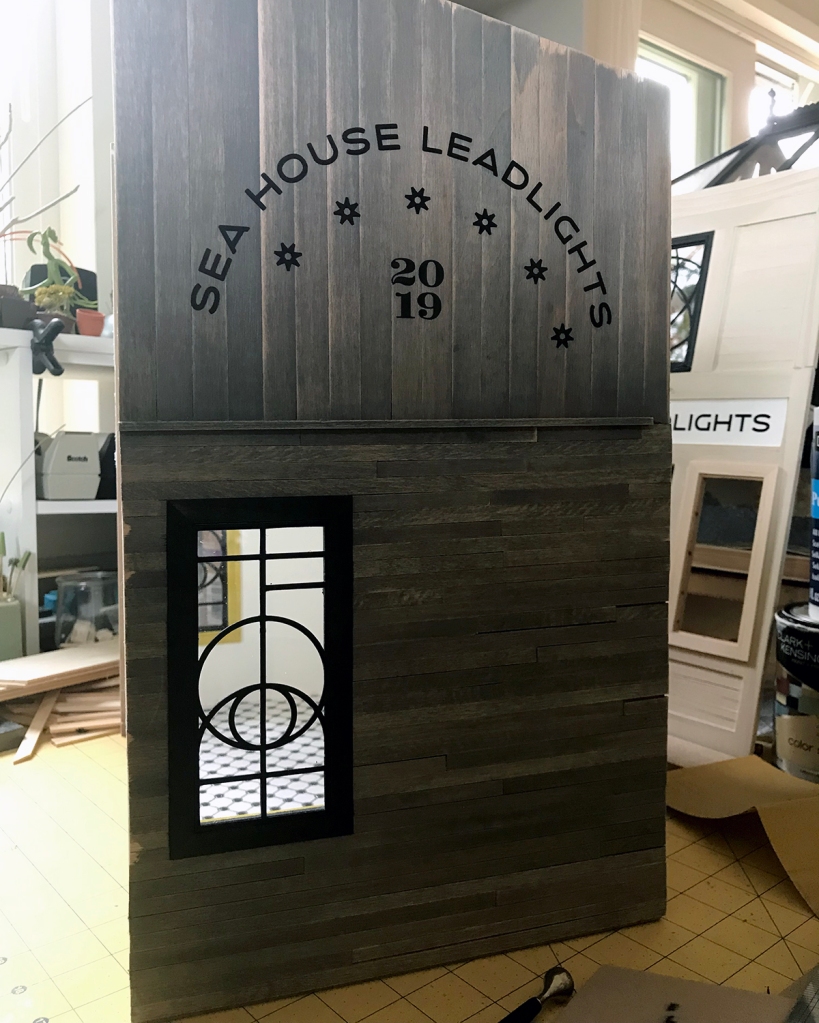
Side building signage
I — or rather the Cricut Maker — cut the signage from matte black vinyl. The stars in the design are meant to resemble anchor plates used to reinforce old buildings. I love them.
In this backlit photo, the vinyl letters appear to float off the side of the building. It’s not quite so unnatural-looking in person, but knocking back the synthetic smoothness is on my eternal learn-to-do list, to find ways to tone down the material. (Transferring wee letters and figures is a fiddly, fussy business, especially onto an uneven surface, and I am not eager.)
Side signView from above
Here’s a roof’s-eye look at the progressing build. The holes are drilled for the LED light fixtures that will illuminate the work space below. (The wiring to be concealed beneath a custom rug and other stuff stored in the loft.) A narrow shelf beneath the scarab window on the removable front might support batteries if I ever add lighting to the front. Floor tiles gleam softly with scuff-resistant utility. Leather window seats beckon.
The entrance to the Sea House Leadlights office is up a few stairs and across the deck to the left of the fireplace. A set of leaded glass doors opens into a snug but functional design studio.
Details: Terra cotta pot by Braxton Payne. Basswood deck and siding stained with Minwax Classic Gray. Pumpkins made from tissue paper and thread. Boulders sculpted from air dry clay painted with acrylic washes and sealed with ultra matte varnish. All succulents, yucca and other plants hand colored with W&N Promarkers. Many are prototypes; some available as kits at Modern Miniature Succulents + Sundries.)
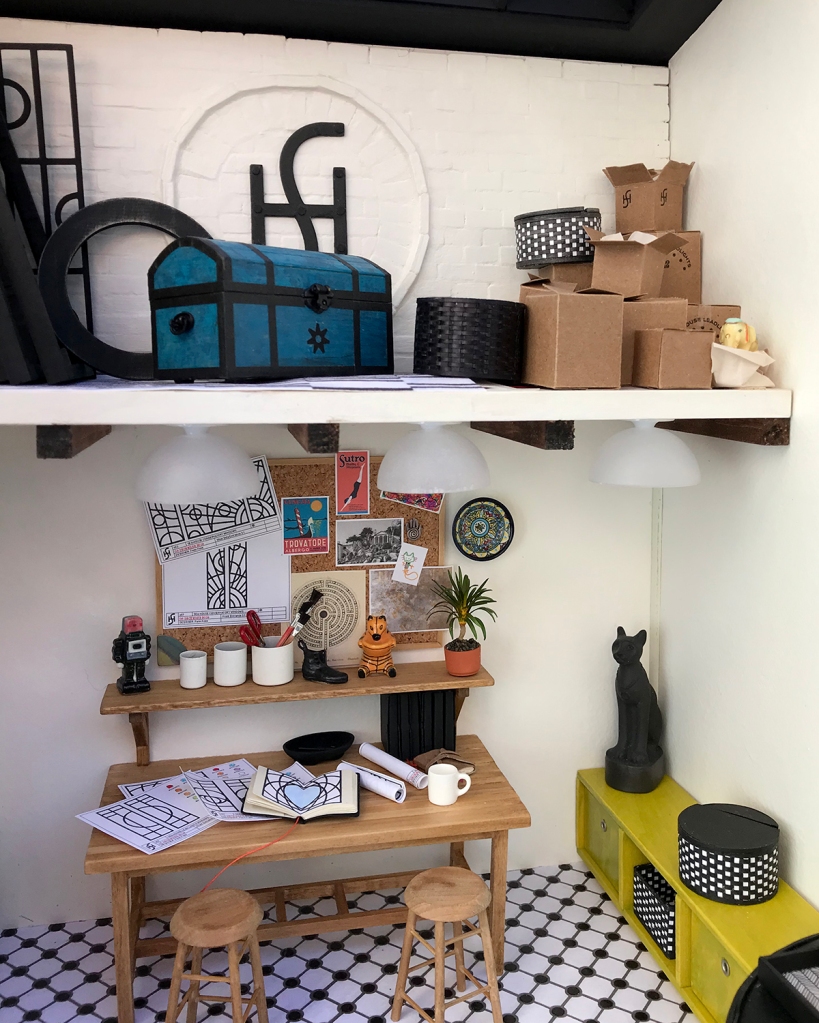
Desk and bulletin board
Beneath the half-loft a large tabletop desk has plenty of room to roll out plans and inspiration. Low built-in cabinets with black leather cushions provide more seating, storage and level surfaces for tea trays.
Details: The ceiling lights are 12V modified for warm white LEDs. Bulletin board is made from cork sheet framed with basswood stained to match. Sketchbooks made from my kits at MMS+S. Various meaningful artifacts including original leaded glass designs for other Sea House buildings, and a drawing of a cat by my then 4-year old daughter. Fèves, prized vintage Monopoly shoe, and an anodized earring from the 1980s.
The white-washed brick loft stores window frames, tools, Sea House memorabilia and miscellaneous treasure — as well as the switch (lift the black basket) and battery pack (hidden in a custom box) for the LED lights.
A gazebo-style roof welcomes natural light. (I’ll detail more of that happy construction in another post.) I made the 1:144 scale basswood model of the source kit for the original Sea House Pavilion, built some years ago. The Egyptian cat is a porcelain fève. Best of all is the vibrant painting by Jim Tracey that commands the studio — also another post.
Finally, of course, Scarlett. Here she has somehow managed to fluidly infiltrate an impossibly small entrance to the Sea House Sea Rise Pavilion loft (my ongoing remodel of the original 2013 build.) I swear she does these things just to remind me she can.
Part of the back wall of the Sea House Leadlights design studio
The back wall of the Sea House Leadlights design studio is about utility and remembrance. There’s a water spigot and old brick patio remnant for transplanting yucca and succulents. A faded advertising poster from nearby attractions survives on the wall, as does a longhorn cow skull from ranch days.
(Details: Brick wall grouted with tinted spackling paste and aged with muddy gray acrylic wash. Garden tools by Sir Thomas Thumb. Terra cotta pot by Braxton Payne. Basswood siding stained with Minwax Classic Gray. Foundation made from styrofoam, detailed here. Cow skull is resin, aged with Winsor & Newton Promarkers. Boulders sculpted from air dry clay painted in several acrylic washes and sealed with ultra matte varnish. All succulents, yucca and other plants hand colored with W&N Promarkers. Many are prototypes; some available as kits at Modern Miniature Succulents + Sundries.)
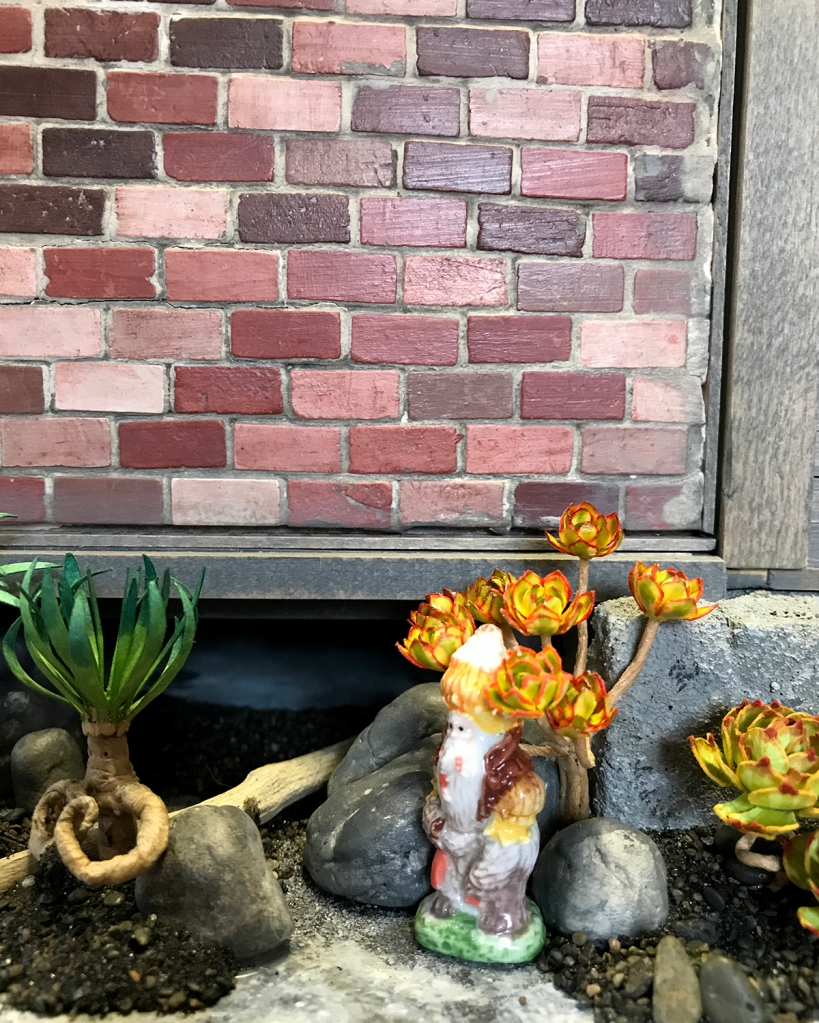
Who is this?
A vintage collection of gnomic being fèves populates the succulent understory. I tried to match their colors with the foliage, as they prefer to blend in. This guy is far more camouflaged in the final build, rest assured.
And, no. Never say never, and never ever compromise your instincts. This is my younger granddaughter Ruby, when somebody told her NO. She is two years old, approaching three. Know your truth.
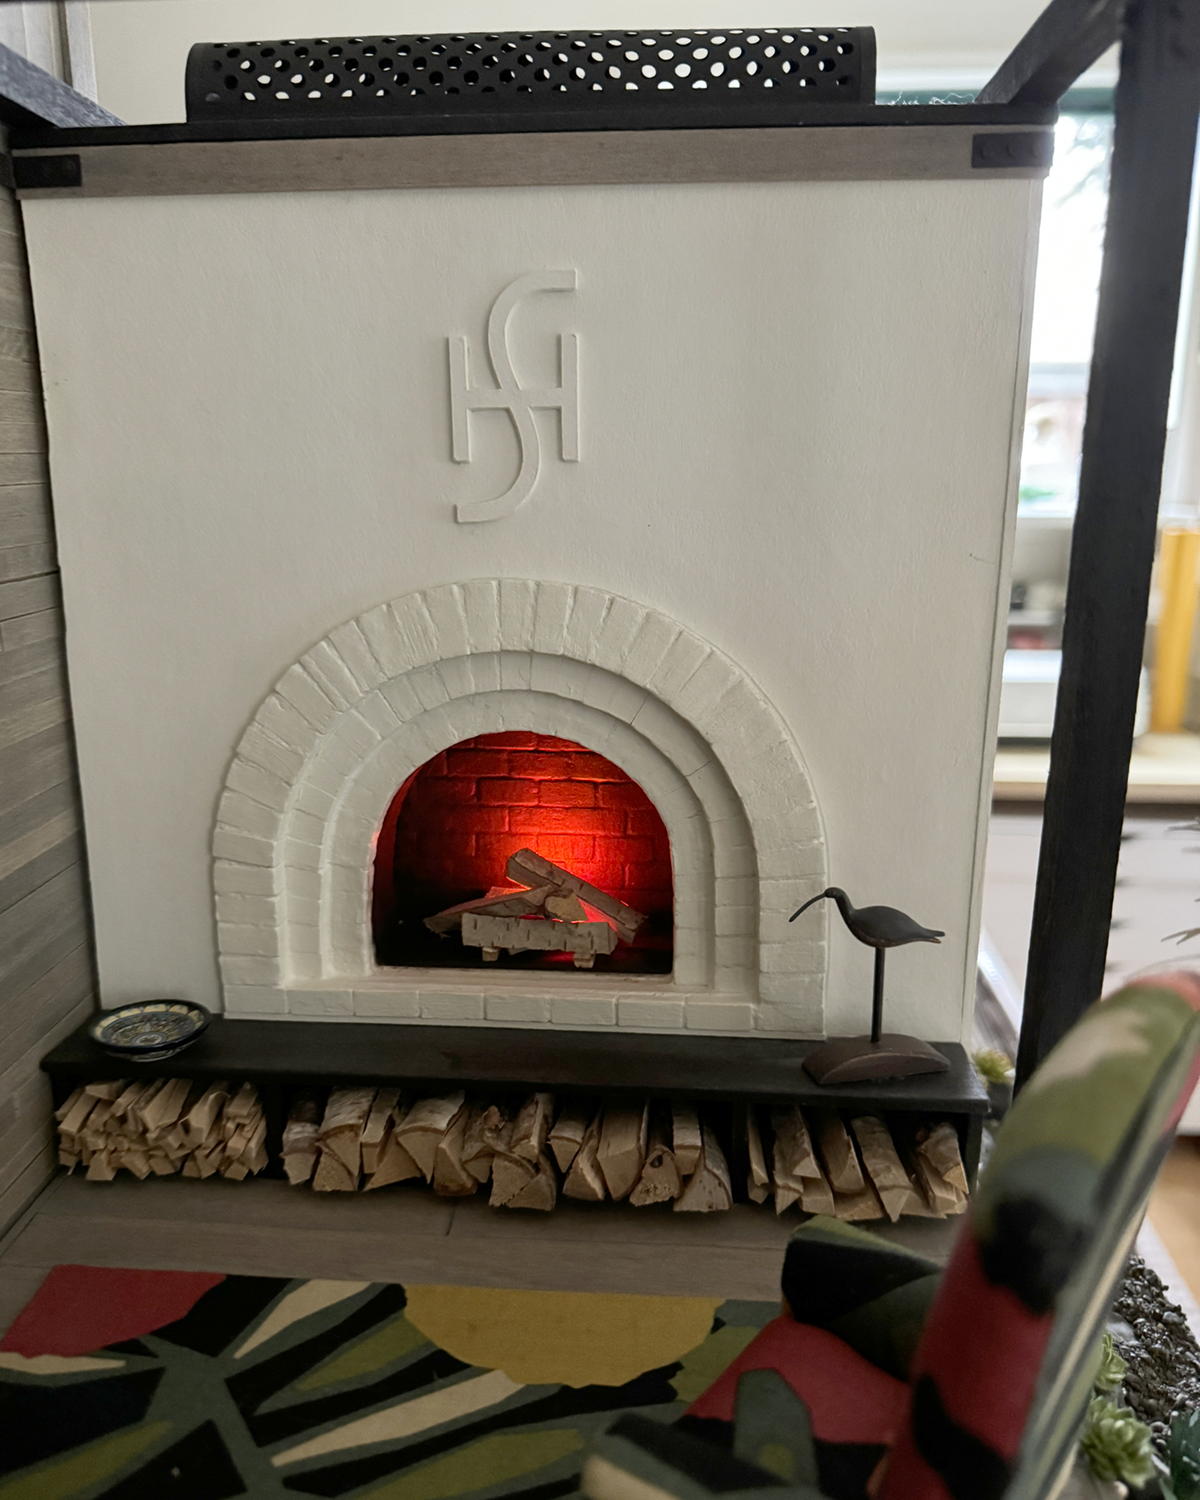
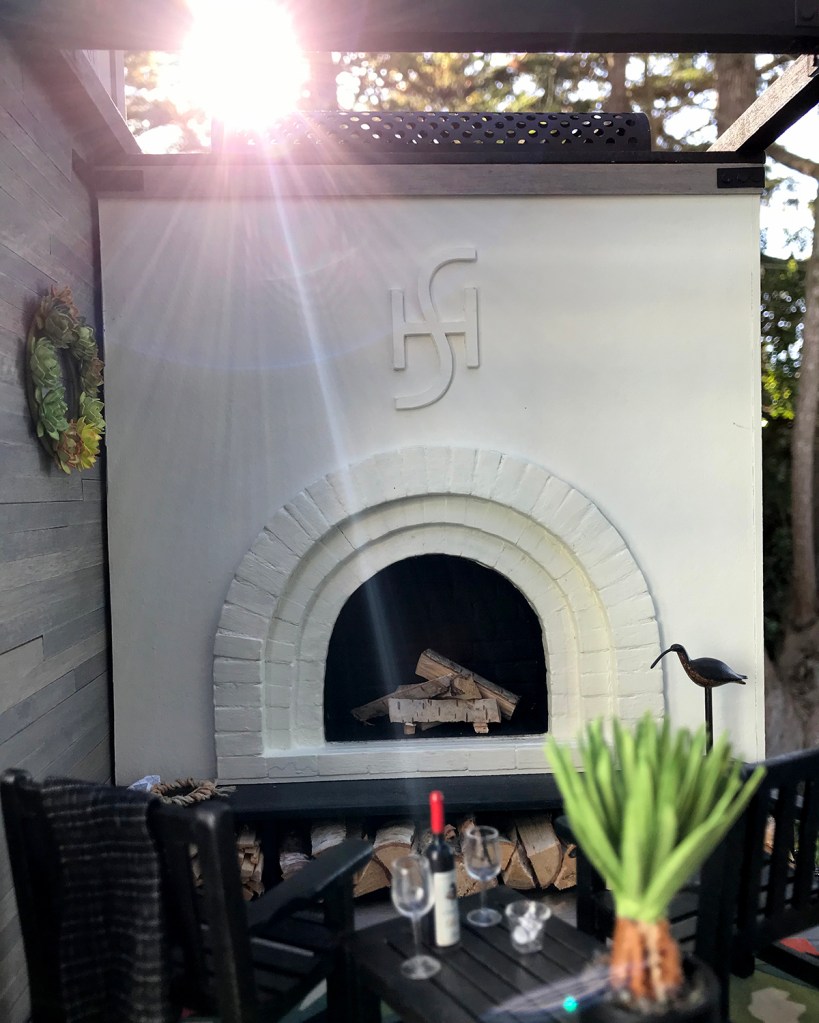
I wanted an outdoor fireplace for the deck because few things are better than being outside than being outside with fire, especially at night. I knew some of the old Sea House building bricks would be involved, but did not have a clear vision of the overall design.
from the October 2019 CB2.com catalog
Until I got a catalog from CB2.com, and saw this. And I knew.
Attempting to translate one reality into another
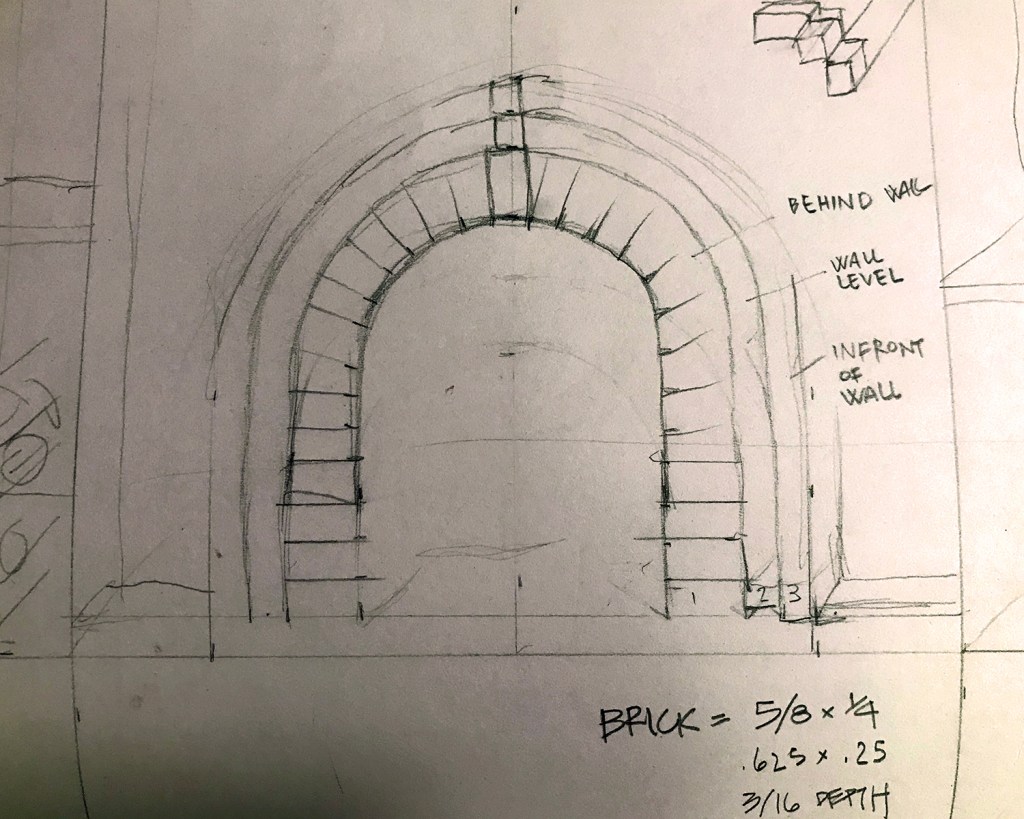
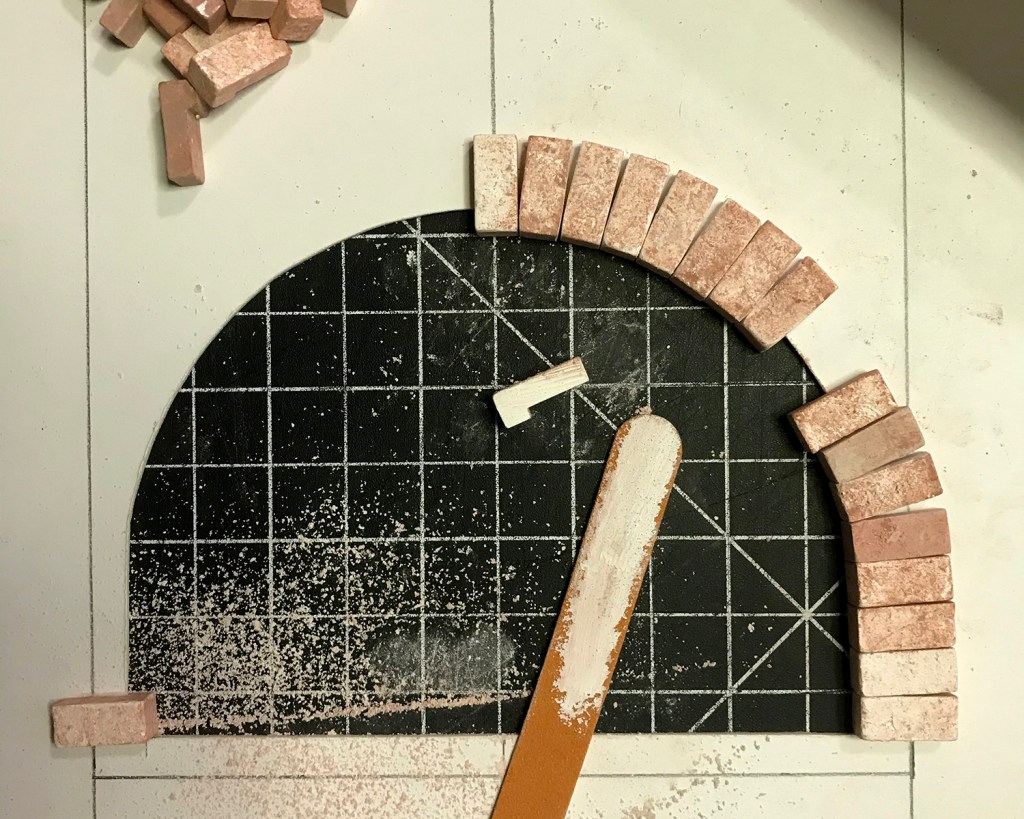
It took more than a few sketches and extended staring into inner space to work out how I could extract the essence of the CB2 fireplace for the approximately 8.5 inches of width I had on the Leadlights side deck. As is typical, I figured out far more once I had the actual materials at hand.
Dimensions determined and mat boards cut. This is the top, outer semicircle.
I used “corner” bricks to edge the semicircles, slightly sanded to fit the curve. Regular brick make up the middle layer.
Inner and middle layers in processTest fitting the the topmost layerGluing the layers and structural reinforcements togetherGrouted and the first of many coats of eggshell white acrylic paintThe back wall of the firebox, to be painted lamp blackNot highly visible, but the arched firebox is glued in, ready to sandwich with the back wall layer.In-progress fireplace roughed in
Here is the final fireplace in situ with split birch logs laid, the spark arrester chimney, comfy chairs and a good red wine ready to pour. The exquisite carved wood sandpiper sculpture is a gift from Keli, keeper of Charlene’s Estate.
Of course the firelight flickers and glows.Sea House Leadlights front exterior, for context
I intend to start writing more here, again. I miss you. I dove deep on this project, and found I could either devote myself to the process of building or to writing, but not both. (I chronicled photo highlights on Instagram; if you’re on there I’m @nancy_k_enge. There’s also lots of pics of Scarlett :)
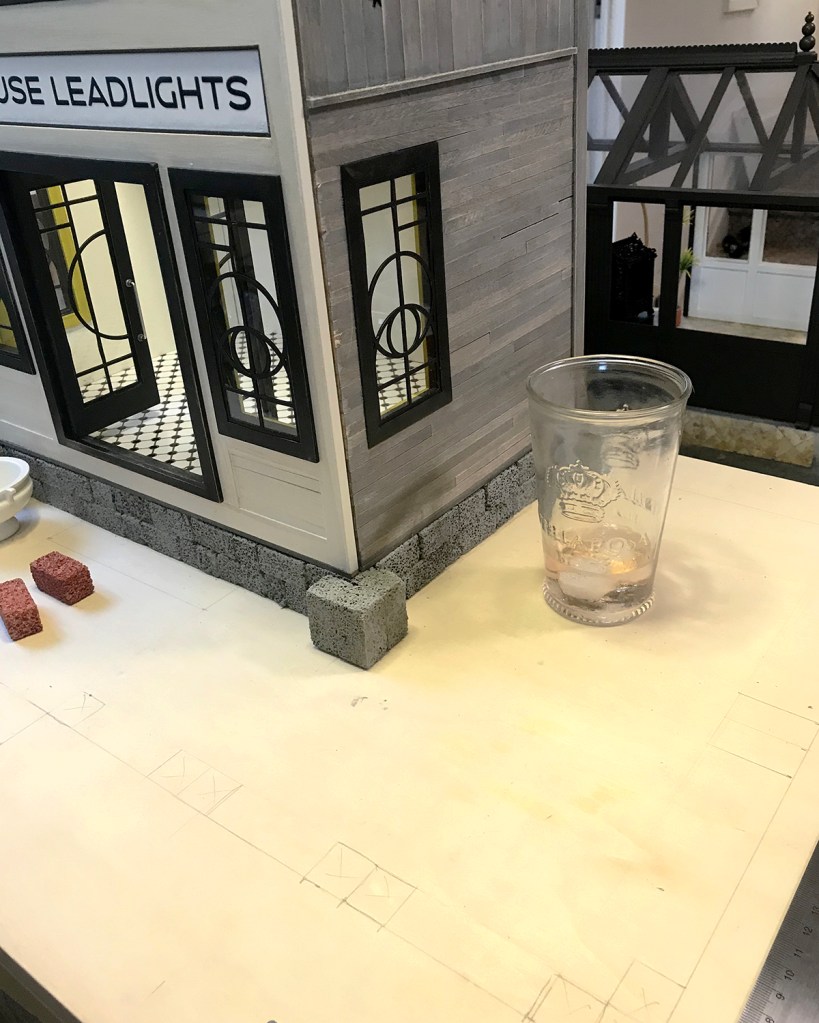
I wanted to raise the Sea House Leadlights building up from the project board, to anchor it to the site with a solid foundation and to allow more space for landscaping. For the other buildings in the Sea House compound I have used air-dry clay, as well as our much beloved egg carton and packaging material to simulate boulders and bedrock.
And then.
Eff me, not styrofoam. Wait, yes, styrofoam cut into conveniently sized blocks.
I came across this product, in an ultra-convenient, innocently beguiling craft form. Yes. Styrofoam, one of the evilest manufactured substances on our beleaguered planet.
In anguished indecision, I stood in the aisle of the crap craft store pondering the consequences of my choices and actions. And then, because I had a 40% off coupon, I bought it.
I built a two-tiered foundation on the project board, anchored with glue and toothpicks.
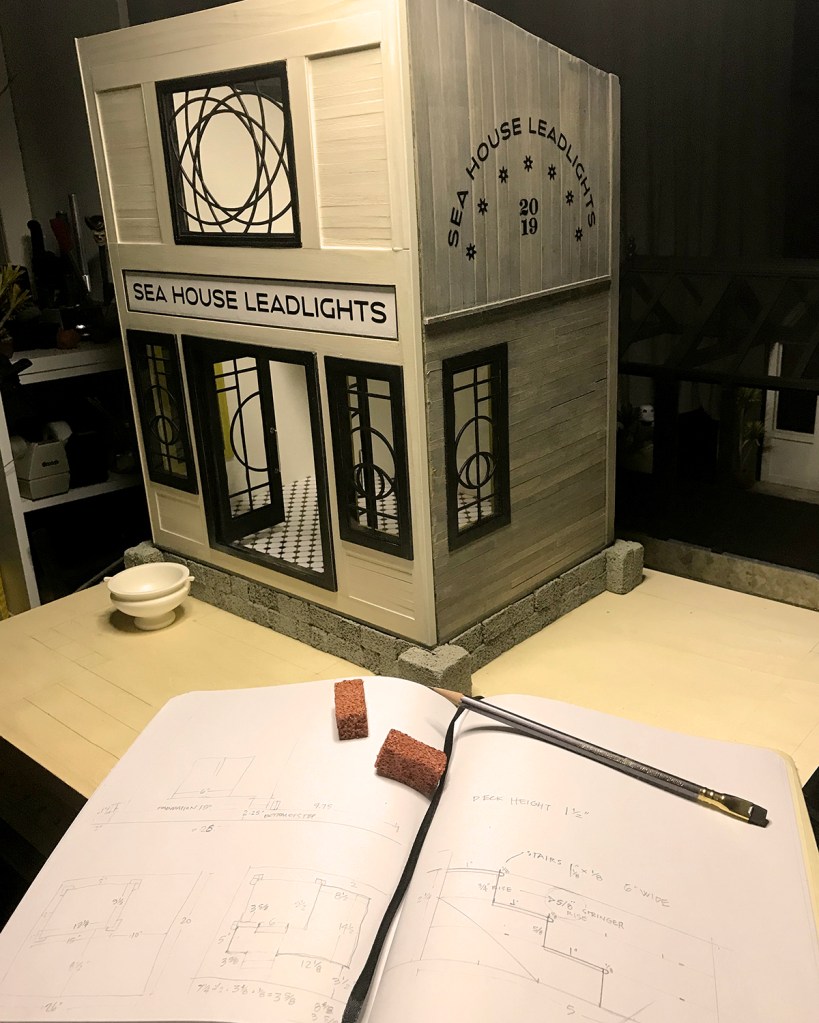
After a couple of base coats of warm and medium gray-green acrylics, I set the build atop the foundation to meld. I’ll add additional highlight details once all of the foundation stones are set.
I added a sill plate? between the structure and the foundation.
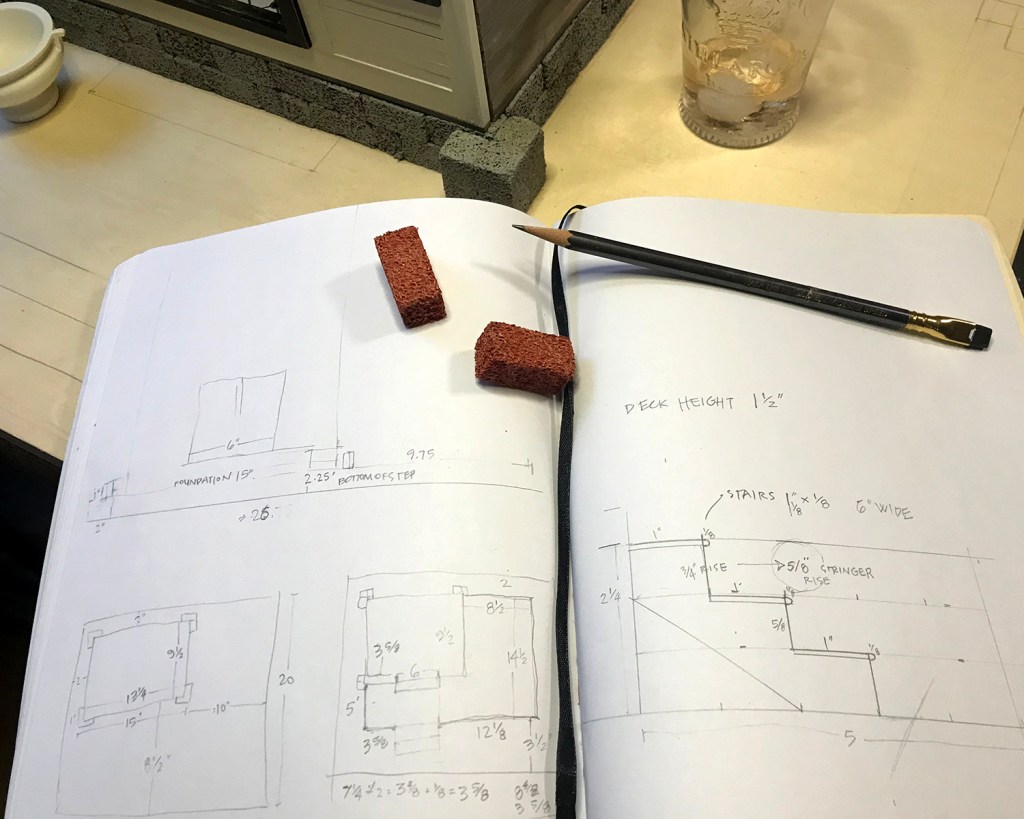
On to visualizing the deck surround Visualizing with measuring and math.Carrying on.
And so. I am conflicted about the inescapable implications and consequences of my materials choices. And yet, I carry on with this build.